Connecting to IT Services Staff printers

The Networked Staff printers need to be set up for each person who logs into a PC. The process is quite easy (when it works) and we can set it up for you. However, there may be occassions when you are using a shared PC or that of a colleague, so I thought it would be useful to provide instruction for those who would like to try this themselves. Quict steps for connecting to a printer are listed below and a guide with screen grabs is also available (Connecting to IT Services Networked Printers).

  • Click on the Microsoft Button (Start)
  • Select ‘Devices and Printers’
  • From the devices and printers window select ‘Add a printer’
  • Select ‘Add a network, wireless or Bluetooth printer’
  • Select ‘The printer I want isn’t listed’
  • Enter the pathname of the printer (\printersStaff-Mono) then click ‘Next’
  • The drivers will be installed on the PC
  • The printer will be installed, click ‘Next’
  • Set at the default printer, print a test page (unless you are connecting to the A0 printer) and then click ‘Finish’
  • The printer appears in the ‘Devices and Printers’ folder and is identified by the green tick icon
  • Repeat the process to connect to the Staff-Colour (\printersStaff-Colour) or A0 printer (\printersA0_cc_plain_hp) and remember to un-tick ‘Set as the default printer

Introducing the Sample button


When photocopying a document a large number of times it is often useful to use the Sample button. The Sample button is white, round and located directly above the green Copy button.

Pressing this button will produce one copy of the document, perfect for checking before you produce lots more copies. Also, this sample copy is included in the total number of copies required – which makes it much easier than setting up the photocopier to print 1 copy then changing it for 99 more copies.

Printing – Emergency stop!

Imagine the situation: you’re printing a job on the staff photocopier and all of a sudden you realise it’s the wrong document! Or maybe instead of your nice printout the photocopier is spewing out loads of sheets of paper with nothing but gobbledygook on them. What would you do?

Me, I’d first press the Print option button on the left-hand side of the console (fourth button down) then click Job Reset on the bottom right of the touchscreen. This will safely cancel the current print job.

And finally click on the MENU button (bottom-left of console) to return the photocopier to it’s usual screen.

Printing tips: page/paper size

IT Services charged print system is not very forgiving when paper sizes are not A4 or A3. This means that your print job may be rejected or the printed text is not formatted on the paper as you were expecting. So, please check the page size selected in your document.

  • MS Word and Excel: Page Layout, Size
  • MS PowerPoint: Design, Page Setup

Alternatively, try forcing the printer to print on the paper size you want (A4 or A3):

  • File, Print then select the printer queue you require (Staff-Mono or Staff-Colour)
  • Click on the Printer Properties link
  • In the Dialog Box select the Paper tab
  • Check the Print on tick-box, select A4 or A3 and then check the Fit to Print Sick tick-box 

Want to print a booklet?

Ever wanted to print your document as a booklet? Well now thanks to the super wizzo print system you can!

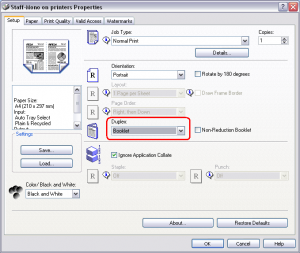
Simply choose the Print option in the application (e.g. Word) you are using. Then when the Print window appears click on the Properties button on the top-right. In the middle of the screen you’ll see a pull-down menu labelled Duplex. Simply click on the down-arrow beside this and choose Booklet. Finally click OK on the printer Properties window and OK again on the Print windows to send this to one of the printer or photocopiers.

Printing in booklet fashion means that it print 4 pages on just a single sheet of paper. Saving the environment and, even better, Library budgets!


Photocopying – Emergency stop!

Have you ever started photocopying something and then realised half way through it’s the wrong thing or contains an obvious mistake? It’s bad enough that you’ve already wasted a load of paper, you don’t want to waste any more!

Fear not for our photocopiers come with a big red Stop button to safely halt the production of unwanted copies.

Print preview

Where has the print preview option gone in Office 2010? It is actually much easier to preview your document in Office 2010 than it was in Office 2007. Simply click on the File tab and select Print. This gives you access to printer options and previews your document. Use the options at the bottom of the preview window to navigate your document and to zoom in/put.

To navigate use the left right arrows or type in a page number in the box provided.Page Navigation

To zoom in/out or reset the page use the -, + or Zoom to Page options.Page Zoom

What job to print?

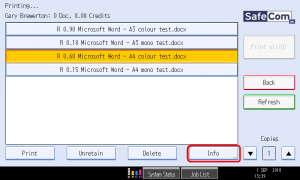
If you log in to one of the printer/copies and choose the Pull Print option you may be accosted by a list of jobs you sent to print. If you only want to print some of these but can’t remember which ones, then a good tip is to click on the Info button on the bottom right-hand side of the touchscreen.

The will then give you some additional information, such as the number of pages and when you sent the document to print, that may help to decide if it is the right job to print.