We moved (back) to using the Best Practical Request Tracker (aka ‘RT’) for managing our service desk incident tickets last year. RT is a great open source ticketing system that Best Practical make available for free if you want to support and extend it yourself, or they’ll happily sell you good value support contracts and hosting packages if you’d like them to manage the technical details. Being a bunch of little Perl code monkeys in the MALS team, we went for the “host and support it ourselves” option, especially as one of our number had run RT before so was able to get us up to speed fast.
Once incident ticketing was working successfully, interest within our department turned to using RT to help manage the change request process we have. The previous commercial service desk systems offered some support for change management but it was… erm… “less than friendly” might be a polite way of putting it. It was actively putting people off from submitting change requests. We needed something that IT staff could understand easily, yet would be able to handle our rather complex change workflow.
RT 4.4 comes with an Approvals system built in. This lets you have tickets in queues enter states that need one or more levels of management to approve them. RT also supports custom defined “life cycles” for queues. This means that the states that tickets can have, the transitions between those states and the rights that users and groups have to make those transitions are all capable of being customised, and different queues in the system can have different ticket status life cycles. This is quite flexible and configurable and is often enough for many sites, but from a bit of a play we knew we’d be doing some local modifications to support the complexity of our change process workflow.
This post details the Loughborough IT Services change workflow and provides a broad overview of how we went about implementing this in RT.
The Loughborough Change Workflow
The Figure 1 below shows the workflow we have for change management here at Loughborough. This is the basis of the change life cycle in RT.
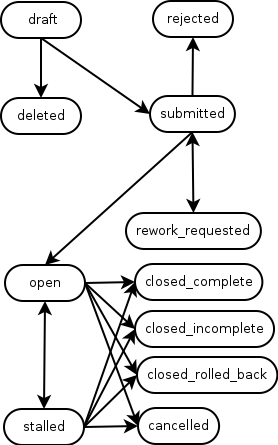
When a new change is created it has a status of draft. It stays in draft until it is either marked as deleted, or submitted for approval. Our changes come in three types: “pre-approved”, “normal” and “emergency” and part of the change request drafting process includes selecting the type (which we keep in one of several custom fields described later). For a “pre-approved” changes (typically changes that happen regularly, have low impact elsewhere and have been well tested), the change request workflow is simple and automated. As soon as the ticket with the request changes state to submitted a scrip changes the status to open so that it can be worked on.
For a “normal” change, we have a two level approval process. Firstly the manager of the team that the person submitting the change is in has to check that the team has sufficient resources and availability to make the change. They have three options open to them. Firstly they can approve the request, in which case the change request ticket is moved to the next phase of change management (see below). If the line manager feels the request is inappropriate, they can turn it down, which moves the change request ticket status to rejected. This is a dead end state – tickets can not be brought back from this and if it is later decided that the change is needed, a new change request will need to be submitted.
Now approving and rejecting are normal RT Approvals options. Where things get interesting is that we have a third option for manager approval: requesting some reworking. This effectively says that the manager thinks the change request is worthwhile, but some aspect of the request needs redrafting before it can be approved. When the manager does this, the change request ticket status is changed to rework_requested and it is passed back to the requestor/owner to make edits on. When this is done, they can alter the change request ticket status to submitted again, and the approval process is restarted. It is possible to go round this loop several times if needs be.
This requires some local modification to /opt/rt4/local/html/Approvals/index.html which cancels the pending approval ticket(s) and then resets the change request ticket’s status to rework_requested. In this file we also take any comments from the manager that go into the approval ticket and copy them into the change request ticket that it is linked to, so that management comments are visible directly to the change requestor/owner. There are also scrips in place that email out these comments from approvers, so that requestors/owners are aware of any conditions or instructions being provided.
Once the line manager has approved a change request ticket, it is moved to our Change Advisory Board (CAB) queue where the Change Manager can review it. This might involve them handling the change request decision themselves, or scheduling it on the weekly CAB meeting agenda for more in depth debate and decision making. As with the line manager, the Change Manager can opt to approve, reject or request rework on the change request, with approval meaning that the change request ticket status changes to open so that it can be worked on. If they request reworking, the change request ticket status is changed to rework_requested and it goes back to the start of this procedure, so once re-submitted it will go to the line manager for a new approval. The reasoning here is that the Change Manager may know that it clashes with other changes, business events, etc, but they don’t necessarily know what resourcing the line manager has in the team at any point in time, so the line manager has to OK the altered change request again.
The last type of change request is the “emergency” change. This are things that need to be done quickly, so there isn’t time to get line manager and CAB/Change Manager approval. An “emergency” change looks like a “normal” change but it goes straight to our Senior Leadership Team’s group for an approval. Typically this is done outside of the system via face to face meetings, texts or phone calls, and the change management system is just recording that the decision has been made, so although the SLT group can theoretically reject or ask for reworking, some “emergency” changes will have already happened (or at least be underway) by the time the change request ticket is submitted.
No matter which of the three change request types are chosen, once the change request ticket has the open status it can be worked on. We have a scrip on the CAB queue that detects the status change and emails the requestor/owner of the change request ticket to let them know this. Work might not take place immediately, as all changes have a “change window” which is recorded in the RT Starts and Due times. Some large, multipart change requests may also be moved to the status of stalled whilst they wait for other things to happen (such as other inter-related changes taking place, or feedback from users on the result of the change). In fact the change request ticket status is free to bounce back and forth between open and stalled as required. The people working on the change can also interact with the ticket as normal at this point, adding comments, etc.
The last phase of any change is its completion. We have four statuses that a change request ticket can take at this point. Firstly it could be closed_complete which means that the change has been successfully made and everything worked. If some bits of the change didn’t work out, but other parts did and a partial result is deemed acceptable, the status can be set to closed_incomplete. If things went seriously wrong and the change had to be rolled back to its previous position and then abandoned, the status is set to closed_rolled_back. Lastly some change requests are obsoleted by other events before they can be undertaken, so these can be abandoned by setting the status of the change request ticket to cancelled.
Change queues and supporting groups
In our department we have a large number of teams, each with a team manager or leader. Many of these teams may be submitting changes, so we made a new change related queue for each team, using the change life cycle described above. The change request tickets only live in these queues whilst being drafted, reworked or awaiting line manager approval. Once a line manager has approved a “normal” change, it is moved by a scrip to the CAB queue for change manager approval. “Pre-approved” and “emergency” change request tickets are immediately moved to the CAB queue once they change status to submitted.
The team change queues are relatively private – only team members and the Change Manager can see the details in them whilst drafting. However once a change request ticket is moved to the CAB queue it is more widely visible to all staff in the department. This lets “more eyes” look at the changes being requested and worked upon, which is helpful in pointing out issues and avoiding clashes.
The team queues usually have at least two groups associated with them (some have more!) which are the team members and their line manager(s). The scrip attached to all the team change queues that watches for change request ticket status changes knows to look for a particular management group based on the change queue that the ticket was created in. This group is used to generate the first line approvals.
We also have groups for our Senior Leadership Team, to whom the Emergency change requests are sent for approval, and the Change Manager, so that we can cover change approval processes during holidays, etc.
Change request user interface
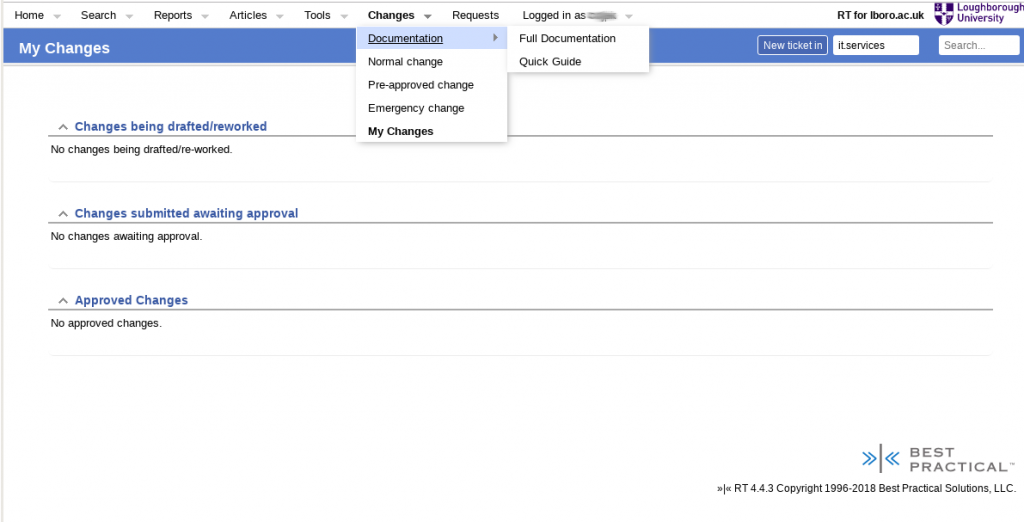
To make the process easier for staff to submit change requests, we produced a set of custom user interfaces and a new menu in RT (see Figure 2). The menu provides staff with links to a simple interface to draft/revise change requests before submission and also see what change requests they have in various stages of drafting, approval, revision and active at the moment. It also has links to another web site that hosts the documentation for both the change request process and the “quick guide” for handling changes in our RT setup.
The change drafting/revision user interface helps the user fill in all the custom fields that are required for the particular type of change they are creating. Technically these change requests are just RT tickets, so they are still free to use the existing RT ticket creation/editing tools even at this stage, but the custom user interface makes it clearer that certain fields are required for certain change types. This results in less to-and-fro movement of change requests that are not completed satisfactorily for approvals by line or change management.
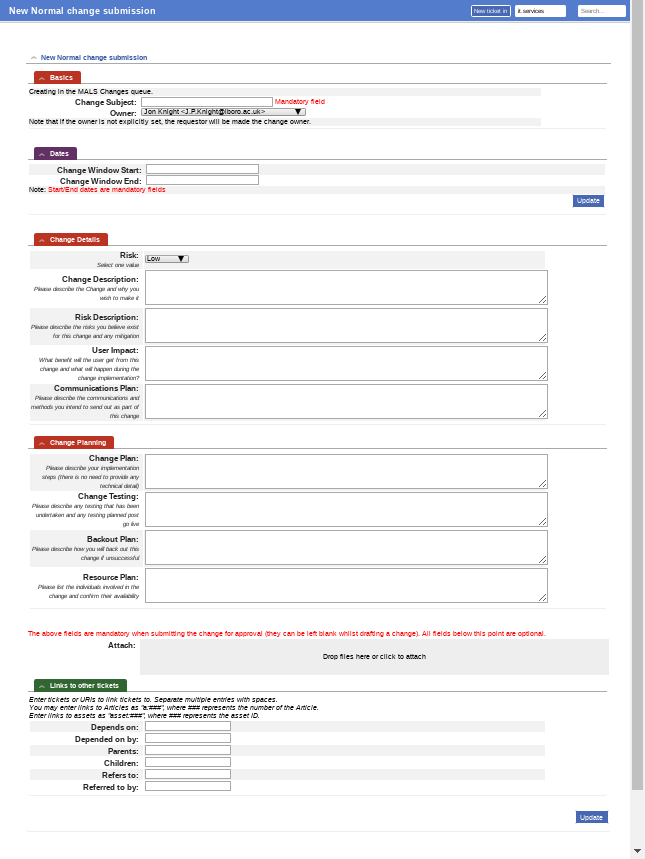
The “normal” and “emergency” change request types look very similar (Figure 3), as they require the same basic information and just differ in the approval flows. They require a change subject (which is the RT ticket subject) and a change window start/end date/time (which becomes the RT ticket’s Starts and Due dates). Whilst drafting the rest of the fields are optional, but before submission the custom fields for risk level, change description, risk description, user impact, communications plan, change plan, change testing, backout plan and resource plan must be filled in. Optionally the submitted change can also have attachments added and/or links made to other tickets in our system (including other change requests, which means that larger programmes of work can have overarching change requests for the whole programme across teams, with individual change requests for particular aspects, all linked together).
The “pre-approved” change user interface looks slightly simpler (Figure 4). It still requires a change subject, start and end dates and a change plan, but the rest of the custom fields detailed above are placed by a drop down selecting an article that details the required process. These articles are normal RT articles in a separate category that the Change Manager can create and edit when “pre-approved” change processes are decided upon or revised.

Auto-reminders for change due dates
Once a change request is approved, a scrip automatically sets a reminder up for the change owner based on the due date for the change window in the request. This not only reminds people of changes they need to work on soon (as some changes are approved some weeks or months in advance) but also reminds them to close the change request appropriately once the work as been done.
When a change is completed or cancelled, we have a scrip that also removes any pending reminders automatically. This stops people being reminded about tickets that have been completed and closed.
Linking to an Office 365 change calendar
We had a pre-existing Microsoft Office 365 shared calendar which was intended to record change requests, so that people could easily see visually how they related to each other and other work, meetings, etc they were involved with. This was not being utilised before we moved the change requests to RT, and the Change Manager asked if we could get RT to create and manage the events in this calendar automatically.
To do this, we made a new custom action called RT::Action::ChangeCalendar and an extension called RT::Extension::Office365::Calendars. The custom action just makes it easier to create scrips that use this action when change request tickets are updated. It makes use of the extension to do the actual work, which in turns uses the Microsoft GraphAPI to talk to the Office 365 system.
The RT::Extension::Office365::Calendars extension offers the following methods:
- CreateEventForTicket – creates a new Office 365 calendar for an event
- UpdateEventForTicket – updates an existing Office 365 calendar event for a given ticket
- DeleteEvent – remove an event from the Office 65 calendar
- FindEvents – get a list of events in an Office 365 calendar
- CalendarExists – check if a named Office 365 calendar exists for a given Office 365 user Id
- FindUserId – find the Office 365 User Id for a given user principle name.
- GetAccessToken – gets the GraphAPI access token to use the API.
The Office 365 tenant UUID, client Id and client secret used to gain access to the GraphAPI are held in our RT_SiteConfig setup so they are easy to alter without adjusting the code. This separation between action and extension also means we can reuse the extension for other Office 365 calendar access in the future (for example putting RT reminders into an individual’s default calendar).
The RT::Action::ChangeCalendar and associated scrips do allow change requests that are being drafted/reworked/in the approval process to be shown in Office 365 as “tentative” events, whilst approved change requests are shown as “busy” status. This gives staff a quick way to check if other people are working on changes that might impinge on their own work or planned changes.
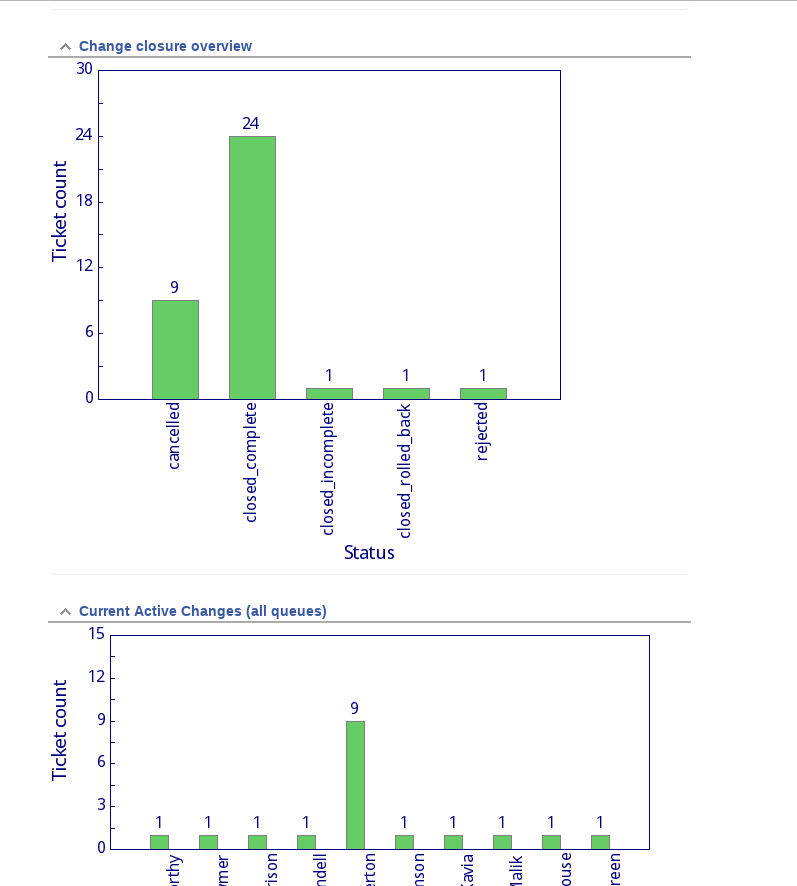
Change reporting
The Change Manager and the Senior Leadership Team were keen on having some reporting to show how well the new RT based change system was working. Luckily RT’s existing SearchBuilder functionality makes most of this reporting quite easy to set up. To start with we set up a dashboard called “Change Reporting” to which we attached graphs based on searches. These included total changes per month, break down of changes types by month (to allow seasonal trends to be spotted), the change closure statuses and currently active change requests broken down by requestor. See Figure 5 for an example of part of this dashboard. These may be expanded upon over time, but these initial reports give the department’s management an nice “heads up” on how the change request process is being utilised.