Using RT to manage partners and visitors

At the University we often have visitors come to our departments. These might be visiting students, visiting academics, contractors visiting to work for the University and all manner of other types of non-member visitor to our campus.

We also have partner organisations that are based on the campus, including sports governing bodies and commercial tenants. The commercial tenants rent space on site for their company and many are spin outs from academic departments or new start ups being run by students or recent graduates.

All of these individuals may need to be issued with identity cards and/or IT access in various forms. A few years ago we were tasked with replacing an existing commercial system to manage them as part of a larger identity management project. The basic requirements were to allow new visitor or tenant users to be requested, have a workflow for checking the requests, managing the ID numbers they are allocated and then tracking the subsequent life cycle of the individual and the organisation of which they are a part. Visitor users and tenant users are slightly different – visitors are requested by a member of University staff who acts as their “guarantor” and they can be either “staff-like” or “student-like”. Visitor accounts can be requested for up to a year, with yearly renewals after that. Tenants on the other hand are requested by the organisation they are a part of and can be valid for as long as the organisation they are part of is a valid tenant on the campus.

Now our team looks after the Request Tracker (RT) system for the University, and we had the bright idea that maybe RT could manage these identities? After all, RT tracks the workflow of a work ticket from creation, through various states until it is rejected or resolved. What we were looking at with visitors and tenants was a workflow, so maybe an RT ticket could represent each individual in the system? These individuals would each be in a single organisation, so in RT terms this is like having a ticket in a queue. So the RT queues could represent the different organisational units of the University and partner/tenant organisations. But would this work?

The answer is (possibly unsurprisingly) yes. We call the resulting system “ALMS”: the Account Lifecycle Management System. ALMS uses RT as a base with lots of custom code, workflows and interactions with other systems. It is highly tied to the way we work at Loughborough University, but the general idea might be applicable elsewhere, hence this posting.

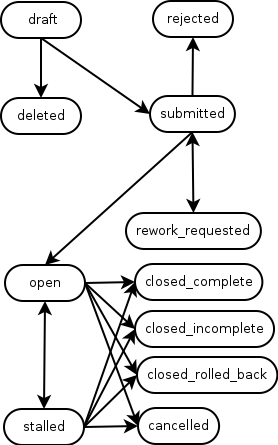
We start with custom RT lifecycles for each of Visitors and Tenants. As normal these detail the various states that a ticket (in our case an individual) can be in as their pass through our visitor/tenant identity management process.

Queues were set up for both University schools/departments/sections and partner organisations, with custom fields attached to each queue to give us some “metadata” about the organisation. For example the dates when the organisation is valid from and to, whether it is part of the University or a tenant organisation on campus, contact details for tenant organisation management, etc.

Within these queues we could create tickets, one per individual visitor or tenant person. These tickets also have a range of custom fields attached to them that allow us to capture things like their given name, last name, contact email/phone details, whether they need a building access ID card issuing, what sort of IT access (if any) they require, when they should be valid from and to, etc. One custom field holds a University ID number that is issued to them as they run through the workflow and is used later by ID card systems and/or for the creation of Active Directory accounts.

We also implemented an approvals process, not using RT’s built in approvals but by using ticket statuses and a set of custom user interfaces written in the Mason framework that underpins RT. We felt that gave us greater flexibility, was more transparent and easier for the users to understand. Ticket status changes are constrained by both the lifecycle transitions defined in the RT site config files, and which groups in RT can access these user interfaces. We have groups for our campus card desk, the IT service desk, University departmental management approvers and various administrative groups.

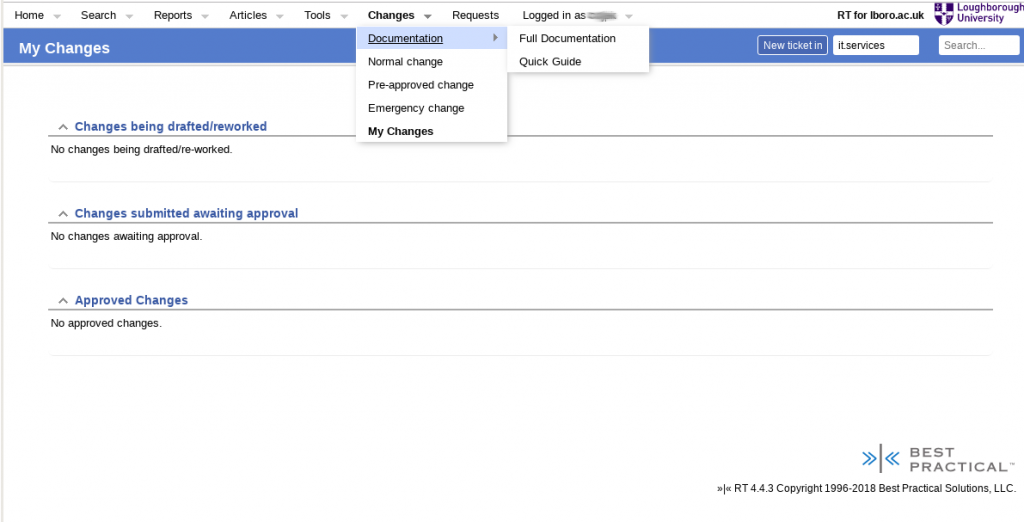
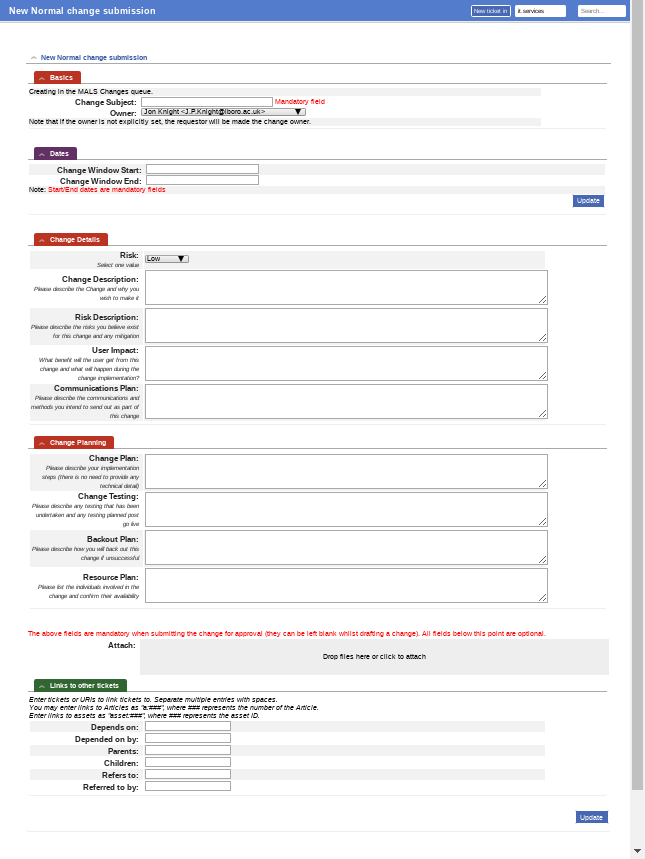
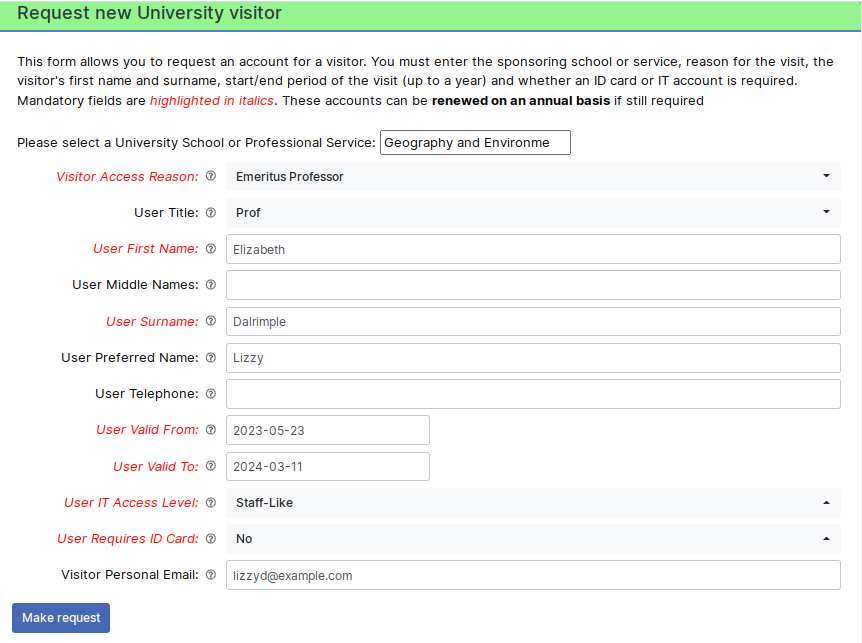
For visitors, there is an ALMS self service form that any member of University staff can use to start a request. We ask them for the visitors basic details such as given and last names, what department they are visiting, why they are visiting (from a selected list of potential reasons), whether an ID card and/or IT access is required, how long (up to a year) the visitor will be required for, etc. Once all the required information is captured and submitted, a new RT tickets is created in the correct department’s queue.

Screen shot of the visitor request self service form in ALMS
An example of the ALMS self service custom visitor request form for use by University staff.

The first port of call is then the department’s management approver(s). These are usually senior managers or administrative staff in the department who can vet the suitability of the request for this visitor. Assuming they approve it, the IT service desk and campus card desk groups are then asked for their approval. Which of them are involved depends on the requirements for ID cards and IT access obviously – no point involving the card desk in an approval for a visitor that does not require an ID card for example. If IT access is requested, custom code picks the required details from the RT ticket once IT service desk approval is given and “mints” a username and/or email address using another system we have on site.

Assuming these groups also approve the visitor, the ticket enters a “Pending” status. It is waiting for its “valid from” custom field date to be reached, at which point the status will be changed to “Active”. This change is done by a regularly run rt-crontool job. Another rt-crontool job does a similar job but looks for when the “valid to” date is approaching and sets the status to “Expiring”. This is a cue for scrips to send out reminders messages to the visitor and their requesting University guarantor that their record will soon expire and will need renewal if they are to maintain the access they have. The guarantor staff member can use another self server custom user interface to submit this renewal request. If the visitor is not renewed by their valid to date, the ticket status is changed by yet another cron job to be “Disabled”.

Tickets in “Active”, “Expiring” and “Disabled” statuses are regularly picked up by our main identity management system using the RT REST2 API. This system is designed to be more generic than just handling visitors and tenants, and gathers user information from not only ALMS but also other identity source systems such as our main student and HR management systems. It is this system that actually does the dirty work of creating and updating records in the Active Directory and passing information required by the building access system for ID card manufacture.

A similar process exists for the tenant users, but in this case there is no self-service request aspect as the tenant organisations request new individuals directly to the campus card desk. When a tenant staff member leaves the organisation it is up to that organisation’s management to tell the University so that we can update the valid to date in the user ticket (which will then start the expiry/disabled status process, but without any emails to guarantors for renewal as there is with visitors).

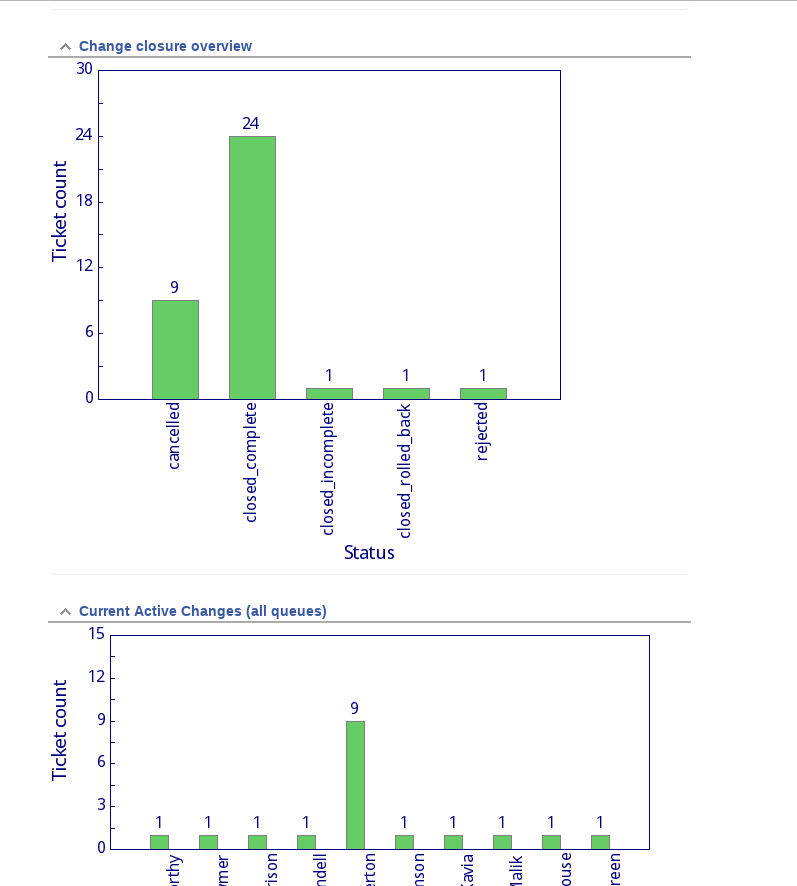
ALMS also provides some reporting information to IT, campus card desk and our commercial partner management groups. It is easy to use RT’s reporting system to provide er organisation lists of users, with break downs by Pending, Active, Expiring or Disabled status for example.

Whilst this has taken some local development work the result seems to be working OK. It has been in service for nearly a year now, and is managing several thousand visitors and tenants. The great thing about using open source software such as RT as the basis of this system is that it has not only cut down our development time considerably but it is far easier for us to customise than some of the commercial systems targeted directly at this market. That makes it cost effective, even factoring our local development and maintenance effort.

Adding LDAP data to RT User Custom Fields

When using Best Practical’s Request Tracker (RT) ticketing system, we populate many of the users in the system from our Active Directory (AD) using RT’s LDAP tools. This means that our users have their username, email, fullname, department and work phone numbers appear in RT based on what is held in the AD.

We’ve recently been asked if we could add some additional information onto the user records in RT based on AD’s LDAP data, but for which there is not an existing RT User attribute available. In this case it was the “description” in an AD LDAP user record, which here includes information on whether the user is staff, student, visitor, etc. This post details how we’ve gone about it using a custom field attached to the User record in RT, plus changes to make this custom field value usable in search results and charts for reporting.

Adding the User custom field

As an RT administrator its relatively easy to create a new custom field and attach it to RT’s users. In this case we decided to call the custom field “UserType” (as that’s the bit of the AD description contents that we’re interested in). Its just a simple single value text custom field in RT.

Importing LDAP description data into the UserType custom field

We have to tell RT how to get LDAP description data into the UserType custom field for each user. In our case this is done in two places in the local RT_SiteConfig.pm:

  • $ExternalSettings
  • $LDAPMapping

Both of these have had an addition made to their LDAP attribute mappings that looks like:

'UserCF.UserType' => 'description',

These extra lines map the LDAP description attribute to the User custom field ‘UserType’, which can then be filled in either during LDAP based logins to the system or nightly via cron invoking the rt_ldapimport tool.

At this point we have a custom field attached to each local user that appears in our AD database, but we wanted to be able to use that in TicketSQL searches and display results.

Accessing UserType custom field in search queries and results

To let us make use of the UserType custom field in searches we need to provide some local tweaks to the RT system. Luckily RT is superb at allowing local modifications to its code base, giving us an /opt/rt4/local directory that, as well as accomodating whole local versions of library routines, HTML/Mason page elements, CSS, JavaScript, images and configuration files, can hold local overlay and callback files to allow us to target changes with minimal disturbance to the distributed code.

In this case we’ll make two alterations via this route: a local overlay for the RT::Report::Tickets RT Perl module to allow us to search on the new custom field and a local callback fired off from the Elements/RT__Ticket/ColumnMap Mason page element to display the vallue of that custom field for a particular type of user (in our case we’re interested in ticket requestors).

The local overlay in /opt/rt4/local/lib/RT/Report/Tickets_Local.pm adds the UserType custom field to “Watcher” grouping of searchable user attributes, and then provides a replacement for the GenerateWatcherFunction() that contains the DBDx::SearchBuilder based implementation of the user custom field searching. It looks like this:

use strict;
no warnings qw(redefine);
package RT::Report::Tickets;

our @GROUPINGS;
push @GROUPINGS, (
    Subject       => 'Enum',
    );

our %GROUPINGS_META;
$GROUPINGS_META{'Watcher'} = {
    SubFields => [grep RT::User->_Accessible($_, "public"), qw(
       Name RealName NickName
       EmailAddress
       Organization
       Lang City Country Timezone
       CF.UserType
       )],
    Function => 'GenerateWatcherFunction',
};

sub GenerateWatcherFunction {
    my $self = shift;
    my %args = @_;

    my $type = $args{'FIELD'};
    $type = '' if $type eq 'Watcher';

    my $column = $args{'SUBKEY'} || 'Name';

    my $u_alias = $self->{"_sql_report_watcher_users_alias_$type"};
    unless ( $u_alias ) {
        my ($g_alias, $gm_alias);
        ($g_alias, $gm_alias, $u_alias) = $self->_WatcherJoin( Name => $type );
        $self->{"_sql_report_watcher_users_alias_$type"} = $u_alias;
    }
    if($column =~ /^CF\.(.+)$/) {
        my $cfName = $1;
        my $cf = RT::CustomField->new( $self->CurrentUser );
        $cf->Load($cfName);
        unless ( $cf->id ) {
            $RT::Logger->error("Couldn't load CustomField #$cfName");
            @args{qw(FUNCTION FIELD)} = ('NULL', undef);
        } else {
            my $user = new RT::User($self->CurrentUser);
            my $type = 'RT::User';
            my $ocfvalias = $self->Join(
                TYPE   => 'LEFT',
                ALIAS1 => $u_alias,
                FIELD1 => 'id',
                TABLE2 => 'ObjectCustomFieldValues',
            FIELD2 => 'ObjectId',
            $cf->SingleValue? (DISTINCT => 1) : (),
                );
            $self->Limit(
                LEFTJOIN        => $ocfvalias,
                FIELD           => 'CustomField',
                VALUE           => $cf->Disabled ? 0 : $cf->id,
                ENTRYAGGREGATOR => 'AND'
                );
            $self->Limit(
                LEFTJOIN        => $ocfvalias,
                FIELD           => 'ObjectType',
                VALUE           => RT::CustomField->ObjectTypeFromLookupType($type),
                ENTRYAGGREGATOR => 'AND'
                );
            $self->Limit(
                LEFTJOIN        => $ocfvalias,
                FIELD           => 'Disabled',
                OPERATOR        => '=',
                VALUE           => '0',
                ENTRYAGGREGATOR => 'AND'
                );

            @args{qw(ALIAS FIELD)} = ($ocfvalias,, 'Content');
        }
    } else {
        @args{qw(ALIAS FIELD)} = ($u_alias, $column);
    }

    return %args;
}


1;

The %GROUPINGS_META hash has had its ‘Watcher’ element replaced to add an extra potentially searchable subfield called ‘CF.UserType’. This is our UserType custom field on the User object we’re searching for. The @GROUPINGS array also has an extra element added in but that’s not really relevant here – we just wanted to add ticket subjects to it.

The main guts of the work comes in the reworked GenerateWatcherFunction() routine. This is based on the version in the distributed RT code, with an additional check to see if the column being processed matches the regex pattern /^CF.(.+)$/. If it does, the part after “CF.” is taken as the name of the custom field to look for (in our case ‘UserType’) and then it uses three DBDx::SearchBuilder calls to do a series of SQL joins to link the user object to the custom field and check if the custom field matches what we’re looking for. We need to not only match a custom field based on the ‘UserType’ custom field name but also make sure that the custom field type matches a User object type. We also need to make sure it has not been disabled.

The second part making the UserType custom field available in searching is the callback for search result display that lives in /opt/rt4/local/html/Callbacks/lboro/Elements/RT__Ticket/ColumnMap/Once. This adds a RequestorsUserType column map for the searches that grabs the UserType custom field for the matched requestors. This looks like this:

<%init>
  $COLUMN_MAP->{'RequestorsOrganization'} = {
    title     => 'RequestorsOrganization', # loc
    attribute => 'Requestors',
    value     => sub { 
      my $deepMembers = $_[0]->Requestor->DeepMembersObj;
      return "None" if(!$deepMembers);
      while(my $member = $deepMembers->Next) {
        if($member->MemberObj->IsUser) {
          return $member->MemberObj->Object->Organization;
        }
      }
      return "Unknown";
    }
  };
  $COLUMN_MAP->{'RequestorsUserType'} = {
    title     => 'RequestorsUserType', # loc
    attribute => 'Requestors',
    value     => sub { 
      my $deepMembers = $_[0]->Requestor->DeepMembersObj;
      return "None" if(!$deepMembers);
      while(my $member = $deepMembers->Next) {
        if($member->MemberObj->IsUser) {
          return $member->MemberObj->Object->FirstCustomFieldValue('UserType');
        }
      }
      return "Unknown";
    }
  };
</%init>
<%ARGS>
$GenericMap => undef
$COLUMN_MAP => undef
</%ARGS>

I should note that this callback also adds a RequestorOrganization display option too. We’ve used that for a while to show which school or department the requestor is from. That data is also pulled from the AD but unlike the UserType it goes into a straight RT User object attribute (the Organization field). This means that we need the Callback to display it in search results, but it is already included in the TicketSQL query builder.

Conclusion

So that’s how we’ve added a custom field to our users, populated the data in it from our ActiveDirectory via LDAP and then made the custom field available in TicketSQL queries and search results. The basic mechanism works well and is relatively easy to understand once you know what you’re looking at. The most complicated part is probably the DBDx::SearchBuilder calls required in the GenerateWatcherFunction() to do searches based on the custom field. However the code above in the overlay for RT::Report::Tickets is generalised – its looking for a search column that starts with “CF.”, and then takes the rest of the column name as the custom field name. Thus we could now easily add other custom fields to user objects and the %GROUPINGS_META hash and search for them in ticket watchers.

Implementing Change Management in RT

We moved (back) to using the Best Practical Request Tracker (aka ‘RT’) for managing our service desk incident tickets last year. RT is a great open source ticketing system that Best Practical make available for free if you want to support and extend it yourself, or they’ll happily sell you good value support contracts and hosting packages if you’d like them to manage the technical details. Being a bunch of little Perl code monkeys in the MALS team, we went for the “host and support it ourselves” option, especially as one of our number had run RT before so was able to get us up to speed fast.

Once incident ticketing was working successfully, interest within our department turned to using RT to help manage the change request process we have. The previous commercial service desk systems offered some support for change management but it was… erm… “less than friendly” might be a polite way of putting it. It was actively putting people off from submitting change requests. We needed something that IT staff could understand easily, yet would be able to handle our rather complex change workflow.

RT 4.4 comes with an Approvals system built in. This lets you have tickets in queues enter states that need one or more levels of management to approve them. RT also supports custom defined “life cycles” for queues. This means that the states that tickets can have, the transitions between those states and the rights that users and groups have to make those transitions are all capable of being customised, and different queues in the system can have different ticket status life cycles. This is quite flexible and configurable and is often enough for many sites, but from a bit of a play we knew we’d be doing some local modifications to support the complexity of our change process workflow.

This post details the Loughborough IT Services change workflow and provides a broad overview of how we went about implementing this in RT.

The Loughborough Change Workflow

The Figure 1 below shows the workflow we have for change management here at Loughborough. This is the basis of the change life cycle in RT.

Figure 1: Loughborough University IT Services change management workflow

When a new change is created it has a status of draft. It stays in draft until it is either marked as deleted, or submitted for approval. Our changes come in three types: “pre-approved”, “normal” and “emergency” and part of the change request drafting process includes selecting the type (which we keep in one of several custom fields described later). For a “pre-approved” changes (typically changes that happen regularly, have low impact elsewhere and have been well tested), the change request workflow is simple and automated. As soon as the ticket with the request changes state to submitted a scrip changes the status to open so that it can be worked on.

For a “normal” change, we have a two level approval process. Firstly the manager of the team that the person submitting the change is in has to check that the team has sufficient resources and availability to make the change. They have three options open to them. Firstly they can approve the request, in which case the change request ticket is moved to the next phase of change management (see below). If the line manager feels the request is inappropriate, they can turn it down, which moves the change request ticket status to rejected. This is a dead end state – tickets can not be brought back from this and if it is later decided that the change is needed, a new change request will need to be submitted.

Now approving and rejecting are normal RT Approvals options. Where things get interesting is that we have a third option for manager approval: requesting some reworking. This effectively says that the manager thinks the change request is worthwhile, but some aspect of the request needs redrafting before it can be approved. When the manager does this, the change request ticket status is changed to rework_requested and it is passed back to the requestor/owner to make edits on. When this is done, they can alter the change request ticket status to submitted again, and the approval process is restarted. It is possible to go round this loop several times if needs be.

This requires some local modification to /opt/rt4/local/html/Approvals/index.html which cancels the pending approval ticket(s) and then resets the change request ticket’s status to rework_requested. In this file we also take any comments from the manager that go into the approval ticket and copy them into the change request ticket that it is linked to, so that management comments are visible directly to the change requestor/owner. There are also scrips in place that email out these comments from approvers, so that requestors/owners are aware of any conditions or instructions being provided.

Once the line manager has approved a change request ticket, it is moved to our Change Advisory Board (CAB) queue where the Change Manager can review it. This might involve them handling the change request decision themselves, or scheduling it on the weekly CAB meeting agenda for more in depth debate and decision making. As with the line manager, the Change Manager can opt to approve, reject or request rework on the change request, with approval meaning that the change request ticket status changes to open so that it can be worked on. If they request reworking, the change request ticket status is changed to rework_requested and it goes back to the start of this procedure, so once re-submitted it will go to the line manager for a new approval. The reasoning here is that the Change Manager may know that it clashes with other changes, business events, etc, but they don’t necessarily know what resourcing the line manager has in the team at any point in time, so the line manager has to OK the altered change request again.

The last type of change request is the “emergency” change. This are things that need to be done quickly, so there isn’t time to get line manager and CAB/Change Manager approval. An “emergency” change looks like a “normal” change but it goes straight to our Senior Leadership Team’s group for an approval. Typically this is done outside of the system via face to face meetings, texts or phone calls, and the change management system is just recording that the decision has been made, so although the SLT group can theoretically reject or ask for reworking, some “emergency” changes will have already happened (or at least be underway) by the time the change request ticket is submitted.

No matter which of the three change request types are chosen, once the change request ticket has the open status it can be worked on. We have a scrip on the CAB queue that detects the status change and emails the requestor/owner of the change request ticket to let them know this. Work might not take place immediately, as all changes have a “change window” which is recorded in the RT Starts and Due times. Some large, multipart change requests may also be moved to the status of stalled whilst they wait for other things to happen (such as other inter-related changes taking place, or feedback from users on the result of the change). In fact the change request ticket status is free to bounce back and forth between open and stalled as required. The people working on the change can also interact with the ticket as normal at this point, adding comments, etc.

The last phase of any change is its completion. We have four statuses that a change request ticket can take at this point. Firstly it could be closed_complete which means that the change has been successfully made and everything worked. If some bits of the change didn’t work out, but other parts did and a partial result is deemed acceptable, the status can be set to closed_incomplete. If things went seriously wrong and the change had to be rolled back to its previous position and then abandoned, the status is set to closed_rolled_back. Lastly some change requests are obsoleted by other events before they can be undertaken, so these can be abandoned by setting the status of the change request ticket to cancelled.

Change queues and supporting groups

In our department we have a large number of teams, each with a team manager or leader. Many of these teams may be submitting changes, so we made a new change related queue for each team, using the change life cycle described above. The change request tickets only live in these queues whilst being drafted, reworked or awaiting line manager approval. Once a line manager has approved a “normal” change, it is moved by a scrip to the CAB queue for change manager approval. “Pre-approved” and “emergency” change request tickets are immediately moved to the CAB queue once they change status to submitted.

The team change queues are relatively private – only team members and the Change Manager can see the details in them whilst drafting. However once a change request ticket is moved to the CAB queue it is more widely visible to all staff in the department. This lets “more eyes” look at the changes being requested and worked upon, which is helpful in pointing out issues and avoiding clashes.

The team queues usually have at least two groups associated with them (some have more!) which are the team members and their line manager(s). The scrip attached to all the team change queues that watches for change request ticket status changes knows to look for a particular management group based on the change queue that the ticket was created in. This group is used to generate the first line approvals.

We also have groups for our Senior Leadership Team, to whom the Emergency change requests are sent for approval, and the Change Manager, so that we can cover change approval processes during holidays, etc.

Change request user interface

To make the process easier for staff to submit change requests, we produced a set of custom user interfaces and a new menu in RT (see Figure 2). The menu provides staff with links to a simple interface to draft/revise change requests before submission and also see what change requests they have in various stages of drafting, approval, revision and active at the moment. It also has links to another web site that hosts the documentation for both the change request process and the “quick guide” for handling changes in our RT setup.

Figure 2: the change request menu and “My Changes” page

The change drafting/revision user interface helps the user fill in all the custom fields that are required for the particular type of change they are creating. Technically these change requests are just RT tickets, so they are still free to use the existing RT ticket creation/editing tools even at this stage, but the custom user interface makes it clearer that certain fields are required for certain change types. This results in less to-and-fro movement of change requests that are not completed satisfactorily for approvals by line or change management.

The “normal” and “emergency” change request types look very similar (Figure 3), as they require the same basic information and just differ in the approval flows. They require a change subject (which is the RT ticket subject) and a change window start/end date/time (which becomes the RT ticket’s Starts and Due dates). Whilst drafting the rest of the fields are optional, but before submission the custom fields for risk level, change description, risk description, user impact, communications plan, change plan, change testing, backout plan and resource plan must be filled in. Optionally the submitted change can also have attachments added and/or links made to other tickets in our system (including other change requests, which means that larger programmes of work can have overarching change requests for the whole programme across teams, with individual change requests for particular aspects, all linked together).

Figure 3: The “normal” change request drafting user interface. The “emergency” change request user interface is identical to this.

The “pre-approved” change user interface looks slightly simpler (Figure 4). It still requires a change subject, start and end dates and a change plan, but the rest of the custom fields detailed above are placed by a drop down selecting an article that details the required process. These articles are normal RT articles in a separate category that the Change Manager can create and edit when “pre-approved” change processes are decided upon or revised.

Figure 4: The Pre-Approved change request user interface.

Auto-reminders for change due dates

Once a change request is approved, a scrip automatically sets a reminder up for the change owner based on the due date for the change window in the request. This not only reminds people of changes they need to work on soon (as some changes are approved some weeks or months in advance) but also reminds them to close the change request appropriately once the work as been done.

When a change is completed or cancelled, we have a scrip that also removes any pending reminders automatically. This stops people being reminded about tickets that have been completed and closed.

Linking to an Office 365 change calendar

We had a pre-existing Microsoft Office 365 shared calendar which was intended to record change requests, so that people could easily see visually how they related to each other and other work, meetings, etc they were involved with. This was not being utilised before we moved the change requests to RT, and the Change Manager asked if we could get RT to create and manage the events in this calendar automatically.

To do this, we made a new custom action called RT::Action::ChangeCalendar and an extension called RT::Extension::Office365::Calendars. The custom action just makes it easier to create scrips that use this action when change request tickets are updated. It makes use of the extension to do the actual work, which in turns uses the Microsoft GraphAPI to talk to the Office 365 system.

The RT::Extension::Office365::Calendars extension offers the following methods:

  • CreateEventForTicket – creates a new Office 365 calendar for an event
  • UpdateEventForTicket – updates an existing Office 365 calendar event for a given ticket
  • DeleteEvent – remove an event from the Office 65 calendar
  • FindEvents – get a list of events in an Office 365 calendar
  • CalendarExists – check if a named Office 365 calendar exists for a given Office 365 user Id
  • FindUserId – find the Office 365 User Id for a given user principle name.
  • GetAccessToken – gets the GraphAPI access token to use the API.

The Office 365 tenant UUID, client Id and client secret used to gain access to the GraphAPI are held in our RT_SiteConfig setup so they are easy to alter without adjusting the code. This separation between action and extension also means we can reuse the extension for other Office 365 calendar access in the future (for example putting RT reminders into an individual’s default calendar).

The RT::Action::ChangeCalendar and associated scrips do allow change requests that are being drafted/reworked/in the approval process to be shown in Office 365 as “tentative” events, whilst approved change requests are shown as “busy” status. This gives staff a quick way to check if other people are working on changes that might impinge on their own work or planned changes.

Change reporting

The Change Manager and the Senior Leadership Team were keen on having some reporting to show how well the new RT based change system was working. Luckily RT’s existing SearchBuilder functionality makes most of this reporting quite easy to set up. To start with we set up a dashboard called “Change Reporting” to which we attached graphs based on searches. These included total changes per month, break down of changes types by month (to allow seasonal trends to be spotted), the change closure statuses and currently active change requests broken down by requestor. See Figure 5 for an example of part of this dashboard. These may be expanded upon over time, but these initial reports give the department’s management an nice “heads up” on how the change request process is being utilised.

Figure 5: Change reporting graphs

Moving LORLS between Library Management Systems

The Loughborough Online Reading List System (LORLS) is the system we developed here at Loughborough to manage the resources for directed student reading.  Academics put their reading lists into the system, and the students can then see them, both directly via a web interface and also embedded in the University’s Moodle Virtual Learning Environment.  LORLS also provides the library with management information to allow them to adjust stock and check which modules have up to date reading lists available. To do this, LORLS links in to other University IT systems such as the student data, the Active Directory and the Library Management System (LMS)

We started to write LORLS just before the turn of the 21st century, so its been around a bit and has already seen a switch from one LMS (BLCMP’s Talis) to another (ExLibris’s Aleph).  In the summer of 2017 we’ve been involved with another LMS transition, this time from Aleph to Koha.  We already have some experience with tying the basic elements of LORLS into Koha as the Dublin Business School use both and we helped them to get LORLS working with Koha for catalogue searches and some of the reports.  This integration uses Z39.50 and is relatively painless to do: LORLS just needs to be told the new host name, port, database name, username and password (if any) to access the new LMS’s Z39.50 server.  For once, standards usage mean it does interoperate OK.

However at Loughborough our LORLS configuration also includes some localised code to provide some extra features that aren’t in the main LORLS distribution, some of which were written after the previous LMS switch from Talis to Aleph.  One of these is the “purchase predictor”.  This a back end script that runs nightly and tries to use reading list data, information the number of students on modules, the loan history of items in the LMS and a few other bits and bobs to provide library staff with suggestions as to which books should be considered for acquisition (and why).

The purchase predictor needs more access to the LMS than Z39.50 provides for.  With Aleph, it has been using some homegrown Perl scripts on our Aleph server that we nicknamed “AIM” to extract required data out of the Aleph Oracle database.  With the move to Koha, these AIM scripts would need to be rewritten or replaced.

The data we need from the LMS is:

  • Budget codes and amounts for departmental spending (so that we know which departments to bill books or parts of books to based on module usage, student numbers, etc)
  • Details of holdings for a work.  In other words, how many copies (items) do we have for a given ISBN?
  • Details of outstanding acquisitions/orders that have been placed but not yet processed or fulfilled. This is required to stop the purchase predictor from continually trying to purchase the same popular works over and over again before orders have arrived and been made shelf ready.
  • The loan history of items for a work in a given period.  This is used to determine when items for a work are heavily used – if there’s always a few loanable books on a shelf then demand isn’t high enough to warrant buying more copies.
  • The prices paid for books when acquired.  This used as part of a process to work out a rough “average” price that an individual book for a work is likely to cost so that it can be compared to the remaining money in departmental budgets. Actual acquisitions may cost more or less obviously depending on the book, supplier discounts, etc, but previous acquisitions of a work give the purchase predictor code a good starting estimate (especially as book re-sellers have awful/non-existent pricing APIs).

Whilst Koha is an open source LMS with a well documented data structure and the ability to have new modules easily added, our instance will be hosted off site for us by PTFS-Europe.  Therefore where possible it was decided to opt for existing Koha API access to the LMS from our purchase predictor code running on servers in Loughborough, rather than adding new, specially written code on their server to replicate the previous AIM scripts.

One option that Koha provides out of the box is the ability for library staff to produce their own reports using SQL SELECTs on the database, and then have these reports made available via a web service API.  This reporting mechanism only supports SELECT statements, so it can only be used in a read-only manner, but that’s fine for much of what the purchase predictor needs to do.  The results of the reporting scripts can be returned in JavaScript Object Notation (JSON) format, which is ideal for our Perl based scripts to ingest and process.  The Koha reporting mechanism does allow parameters to be passed into the report SQL statement, so the purchase predictor can influence what each report generates (for example passing the ISBN of the work that it needs a loan history for, and the earliest loan date that we are interested in).

Most of the required data above can easily be retrieved from Koha using the above scripts.  One that we do have to be careful about though is the loan history of works. Current and old issues in Koha are held in two, potentially very large tables and its very easy to accidentally write SQL that will start table scanning them as not all the columns required are indexed.  SQL run from the Koha reporting system can bring the underlying MySQL server to its knees if the table scans start generating large amounts of memory use, which they might for popular works.

As an alternative to this is to use the Koha statistics table to pull the current day’s issues out, and store them in our own MySQL server on the LORLS host.  We already did something similar to this for the Aleph server, and for much the same reason: using AIM scripts to live trawl through all the issue records could overload its Oracle server.  Our MySQL loan history database is added to daily with the previous day’s issues and has indexes created so that subsequent queries for work loan history can easily and quickly look back a month or two.

We tested the resulting SQL queries and a slightly modified version of the existing LORLS purchase predictor code on the test/development Koha installation, with some migrated dry run test data imported from our live Aleph LMS.  This appear to predict sets of suitable purchase suggestions for a variety of departments and modules.  We’re now waiting for our Koha LMS to go live.  No doubt this will still require a few tweaks in day to day use, but it does appear that the LORLS purchase predictor can be ported between LMSes.


Thoughts on designing our API infrastructure

One of the things MALS gets upto, alongside drinking tea and talking about space rockets, is building Application Programming Interfaces (APIs) to allow access to systems we write, or that we’re trying to glue together. We also make heavy use of third parties’ APIs (for example Google Calendars and Microsoft’s Graph API) so we understand the value in being able to programmatically access data held within a system, to extend and embed it within the rest of the University’s IT ecosystem. Until now we’ve made our own APIs on a pretty ad-hoc basis, custom written for each service they support. Looking to the future we foresee more and more APIs being created and potentially getting wider usage, so thought it was about time we planned how we would tackle these.

We’re mostly interested in RESTful APIs, as we find those the easiest and most useful to work with. We have had to use SOAP based APIs in the past and they are rather more painful to deal with, so we don’t intend to build any more of them.  We don’t really care much about the implementation language, although a lot of what we write will probably be in Perl (its our preferred language for dev-ops work here) the API format is by design pretty much language agnostic.

A bit of whiteboard brainstorming threw up a list of things to consider:

  • Authentication/authorization
  • The need for some “public” APIs to provide information from the University to the Open Data community
  • Consistent and extensible URL formatting
  • Utilising suitable scoping and HTTP access methods
  • Using a standard protocol such as OData

Here’s our current thoughts on each of these.

Authentication/authorization

For lots of the APIs  we will need to be able know who is trying to access them and then tailor the data returned to them, to a suitable subset of the data we hold.  In other words, we need to be able to authenticate the API caller and then know what they are permitted to retrieve or alter.

The standard that many RESTful APIs are now using is OAuth2, and we propose to follow suit. We need to determine what OAuth2 flows and grant types we wish to support though.  The use cases we can foresee at the moment are:

  • Trusted server to server APIs, which can use a confidential client credentials flow
  • Web apps on client devices using the authorization code grant flow

When these flows issue access tokens, they should have a maximum lifetime of 3600 seconds (1 hour).  For flows where refresh tokens are available, these can have a longer lifespan – anywhere from 1 hour to 14 days would seem sensible and may be something we should be able to configure on an API by API basis.

In the past, some basic APIs have had access controlled solely using IP based restrictions. We’d like to move away from that, partly to improve security and partly to permit caller mobility within the network, without having to reconfigure the API access controls (for example allowing virtual machines to move between data centres on different VLANs). However we’ll have to support this legacy access control for some time for existing APIs.

Public APIs for Open Data

Open Data is something that organisations have to increasingly interact with, and so we can foresee people coming to ask us to provide APIs for existing data sets and information sources within the University. For some of these it may not be appropriate to ask remote callers to register before accessing the resource, so we need to be able to allow some API end points to have a “default” guest access if no authentication is performed.

URL Formatting

We discussed a number of options for laying out the parts of the URLs pointing at API endpoints. Some options were:

  • /dept/service
  • /dept/group/service
  • /service
  • /service/operation
  • /service/{version}/operation

We gravitated towards the last of these.  We discounted the “dept” and “group” path components because, whilst they might identify the organisational unit responsible for the API at first, changes in management structure are all too common and would soon obsolete these.  We will need to have a database system to record which groups are the “owners” of which APIs anyway, and that information does not need to be exposed to the calling programs.

In the chosen format, “service” is the thing that the API is providing access to (for example “printers” or “interlibraryloans”), the “operation” is what aspect of that service the API is working on (“location”, “request”, etc) and the “{version}” is a monotonically increasing integer version number (of the format v1, v2…). This reflects the structure that companies such as Google and Microsoft are adopting for their RESTful API URLs. Having the version number embedded in the URL allows us to simultaneously support multiple version of an API, which may be useful in migrating to new implementations, extra features, etc.  We thought about having multi-part version numbers, but decided it was cleaner and simpler to have a simple integer for production services.  We can always use “dev” or “beta” for test/dev versions of the API.

The “operation” does not need to include “get”, “update”, “create”, “delete” as part of that path component.  These are given by the HTTP method(s) used to access the API. Behind the scenes the API could be one single program that can handle multiple access methods, or we can use the web server to direct the requests to different scripts based on the requested HTTP method.

HTTP Methods & Accept headers

The HTTP methods that the APIs support determine how data is read, created, updated and removed. We propose the following methods should be supported where appropriate:

  • GET – retrieve resource data
  • POST – create a new resource
  • PUT – update a resource, replacing all existing data with the new data supplied
  • PATCH (or MERGE) – partially update a resource using only specified properties
  • DELETE – remove a resource

As APIs could conceivably return a variety of data formats, we need to be able to allow the client to specify what type it wants.  In the past (in LORLS) we’ve used a query parameter to indicate whether to return XML, JSON or JSONP, but it was decided that we should really use the HTTP Accept headers.  Each API may have to decide on a default format if no suitable Accept headers are passed in, which might be as simple as returning an error.

Cross Origin Resource Sharing

As many of the APIs will be used from Javascript running in a web browser, we may need to support Cross Origin Resource Sharing (CORS).  This means that our APIs will need to support the OPTIONS method as we will have mehods in use other than GET, POST & PUT (for example DELETE and PATCH) and/or may require custom headers in some cases.

OAuth2 Scopes

The use of OAuth2 means that we can also have scopes provided.  We may want to have some generic scopes that all of our APIs can understand (for example whether basic identity data can be read or read/write) as well as scopes specific to a given API.

Standard Protocol Options

Should we use something like OData or Swagger.io to provide a standardized abstract data model for our APIs? They have the advantages that they have a growing eco-system of supporting tools and libraries which would reduce the amount of code each API would require, permit flexible search and retrieval options and can provide metadata about the resource entities and API operations that are available to a client.  The downside is that they will require a lot more supporting infrastructure to be provided, and may be overkill for internal or lightly used APIs.

We may have to investigate if we can provide a minimal, lightweight version of one of these standards so that if it does become useful/important to implement them more fully we already have the basics in place.

Food for thought…………

Programmatically inserting Internet Calendar subscriptions into Outlook Web Access via Exchange Web Services

As part of the work required for moving all of our students from Google Apps for Education to Microsoft Office365, we’ve got to somehow replicate our timetabling information calendars.  We did these in Google a year or so ago, and they’ve been pretty successful and popular in production use, both with the students and the folk who run the timetabling. Losing the functionality they provide would be unpopular, and make the Office365 migration somewhat less compelling for the University as a whole.

We’d naively hoped that Microsoft’s new Graph API would let use do this using Office365 groups, but it has limitations when you need to do things as overnight batch jobs running on behalf of thousands of users.  We did hack up a script that used a combination of Graph and Exchange Web Services (EWS) (the older, SOAP based API from Microsoft) to create Office365 group calendars, but we found that we’d need a large number of fake “system” users that would own these groups/calendars due to per user calendar/group creation and ownership limits.  We put this to the project team, but it wasn’t a popular idea (despite that being similar to how we do things in Google land. But then again Google Apps for Education users are free so we don’t care how many we create).

As an alternative it was suggested that we look at generating iCalendar (ICS) format files that the students could subscribe to. We’d already done something similar for staff who are already on Office365, so creating these from our intermediate JSON data files that we currently use to feed into Google was relatively easy. It should be noted that this is subscribing to constant periodic updates from an Internet delivered ICS file, not just loading a single instance of an ICS file into a user’s default calendar – the same file format is used for both operations!

It was then suggested as part of the project that we investigate how we could force calendar subscriptions to these ICS files in Office365.  The existing staff subscriptions are optional and each individual staff user has to subscribe themselves.  Not many do to be honest, and this option would potentially create a lot of work for the service desk and IT support folk when students are migrated, and then at the start of each year.  If the students could have the subscription to the pre-generated ICS file made for them, and kept up to date (so that if they accidentally delete it, it gets reinstalled automatically within 24 hours), we’d have something that would look very much like the existing Google calendars solution.

A quick search (via Google!) showed that quite a few people have asked how to create subscriptions automatically to Internet calendars before… and the usual answer that comes back from Microsoft is that you can’t.  Indeed we’d asked initially if Graph API could do this, but got told “not yet supported”, although it was a “great scenario”.  This is rather surprising when you consider that Microsoft are selling Office365 partly on its calendaring abilities. We know the underlying Exchange system underneath Office365 can do it as you can set it up from Outlook Web Access (which appears to use its own proprietary API that looks like a JSON encapsulation of EWS with some extra bits tacked in!).

Intrigued (and tasked with “investigate” by the project), we attempted to hunt down how Office365 sets up and stores Internet calendar subscriptions.  This was a long and tortuous path, involving sifting through large amounts of EWS and Exchange protocol documentation, using MFCMAPI to look at the “hidden” parts of Exchange accounts, quite a lot of trial and error, and an awful lot of bad language! 😉

It transpires that subscriptions to Internet shared calendars generate what appears to be a normal calendar folder under the “calendars” distinguished folder ID.  This calendar folder has a “Folder Associated Item” attached to it, with a class of “IPM.Sharing.Binding.In”.  We’re not sure what that associated item is for yet, but it doesn’t appear to contain the URL pointing to the remote ICS file.  Its most likely metadata used by the internal system for keeping track of the last access, etc.

The Internet calendar file URL itself is actually stored in a completely different item, in a different folder.  There is a folder called “Sharing” in the root folder (note this is the user’s top level root folder, above the “msgrootfolder” that contains the mailbox, calendars, etc) and this contains items for each internet calendar subscription, including ones that have been deleted from the OWA front end.  These items are in the class “IPM.PublishingSubscription” and, just to make something that is hard even harder, the ICS URL is hidden in some “Extended Properties”. MFCMAPI is a handy tool in the Exchange hacker’s toolbox!

Extended Properties are effectively places that the underlying MAPI objects provide to applications to store custom, non-standard data. You can access and manipulate them using EWS, but only if you know something about them.  The GetItem method in EWS lets you ask for an ItemShape that returns all properties, but it transpires that Microsoft’s idea of “all” means “all the standard properties, but none of the extended ones”. Luckily the MFCMAPI application uses MAPI rather than EWS and so exposes all of these Extended Properties.

The Extended Properties that appear to contain Internet calendar subscription information appear in the property set with the GUID ‘F52A8693-C34D-4980-9E20-9D4C1EABB6A7’.  Thankfully they are named in the property set so we can guess what they are:

Property Tag Property Name Example Contents
0x8801 ExternalSharingSubscriptionTypeFlags 0
0x80A0 ExternalSharingUrl https://my-test-server.lboro.ac.uk/timetables/jon.ics
0x80A1 ExternalSharingLocalFolderId LgAAAACp0ZZjbUDnRqwc4WX[…]
0x80A2 ExternalSharingDataType text/calendar
0x80A6 ExternalSharingRemoteFolderName Timetable for j.p.knight@lboro.ac.uk

We guessed that the ExternalSharingLocalFolderId Extended Property would point to the normal calendar folder.  It does, but there’s a twist still: EWS returns this ID in a different format to all the others.  Normally, EWS returns folder IDs, item IDs as Base64 encoded binary strings in a format called “EwsId”.  Whilst ExternalSharingLocalFolderId is indeed a Base64 encoded binary string, it is in a different format called “OwaId”. If you feed an “OwaId” format identify that you’ve got from a FindItem or GetItem call in EWS back into another call in EWS, you’ll get an error back.  You have to take the Base64 encoded “OwaId”, pass it through an EWS ConvertId call to get a Base64 encoded “EwsId” and then use that.  No, it doesn’t make any sense to us either!

So that lets us get the ICS calendar data back out for calendar subscriptions.  We could theoretically then generate forced subscriptions by creating these folders/items and filling in the extended properties with suitable data.  However from our point of view of providing a supportable, production service we decided that we’d gone too far down the Exchange rabbit hole. We would be relying on internal details of Exchange that Microsoft haven’t documented, and indeed have said isn’t supported. At the moment we’re deciding what to do instead. The default fall back is to just give the students the ICS calendar file URL and explain to them how to set up subscriptions using the OWA web interface. This will be give a poorer user experience than the current Google calendars do, but there’s not really much else we can do unfortunately.

Getting an X.509 certificate into an Office365 Azure AD app manifest

We’ve been playing with Office365 apps as part of the preparation for a move from Google Apps for Education to Office365 for our students (not my idea!). I’ve been trying to use the new REST based Microsoft Graph API to talk to Office365 from a daemon process so that we can update timetable information in calendars nightly (which is what we do at the moment with Google’s calendar API and it works well). Unfortunately Graph API is relatively new and isn’t really ready for prime time: for one thing it doesn’t support daemon processes that are using the confidential client OAuth2 authentication flow creating/updating calendar entries on Unified Groups (even though it does support the same deamon creating and deleting the Unified Groups themselves and adding/removing members. No, I’ve no idea why either… I assume its just because it is a work in progress!).

So the next trick to try is to use Exchange Web Services (EWS) via SOAP to see if that can do what Graph API can’t yet. EWS can use OAuth style bearer tokens, so I hoped I could use the nicer Graph API where possible and just have to put the nasty SOAP stuff in a dark corner of the code somewhere. Unfortunately, the SOAP OAuth didn’t like the access tokens that Graph API was giving back: it complained that they weren’t strong enough.

It turns out that this is because I was using a client ID and secret with the Graph API’s OAuth2 code to get the access token, but EWS SOAP calls require the use of X.509 certificates. And this is where, once again, developing against Office 365 gets “interesting” (or to put another way, “massively painful”). The Azure AD management portal offers a nice interface for managing client IDs/secrets but no user interface for doing the same with X.509 certificates. So how do you link an X.509 certificate to an Azure AD app?

The answer is via the “app manifest”. This is a JSON format file that you can download from the Azure AD management portal’s page for the app. Its also very lightly documented if you don’t happen to be sitting at desk in the bowels of Microsoft. Luckily there are very helpful Microsoft folk on Stack Overflow who came to my rescue as to where I should stick my certificate information to get it uploaded successfully.  My certificates were just self signed ones generated with openssl:

openssl req -x509 -days 3650 -newkey rsa:2048 -keyout key.pem -out cert.pem

The key information I was missing was that the X.509 information goes into its own section in the app manifest JSON file – an array of hashes called “keyCredentials”.  In the original app manifest I’d downloaded, this had been empty, so I’d not noticed it. The structure looks like this:

"keyCredentials": [
{
"customKeyIdentifier": "++51h1Mw2xVZZMeWITLR1gbRpnI=",
"startDate": "2016-02-24T10:25:37Z",
"endDate": "2026-02-21T10:25:37Z",
"keyId": "&lt;GUID&gt;",
"type": "AsymmetricX509Cert",
"usage": "Verify",
"value": 3d4dc0b3-caaf-41d2-86f4-a89dbbc45dbb"MIIDvTCCAqWgAwIBAgIJAJ+177jyjNVfMA0GCSqGSJWTIb3DQEBBQUAMHUxCzAJBgN\
VBAYTAlVLMRcwFQYDVQQIDA5MZWljZXN0ZXJzaGlyZTEVMBMGA1UEBwwMTG91Z2hib3JvdWdoMSAwHg\
YDVQQKDBdMb3VnaGJvcm91Z2ggVW5pdmVyc2l0eTEUMBIGA1UECwwLSVQgU2VydmljZXMwHhcNMTYwM\
<Lots more Base64 encoded PEM certificate data here...>
AiVR9lpDEdrcird0ZQHSjQAsIXqNZ5xYyEyeygX37A+jbneMIpW9nPyyaf7wP2sEO4tc1yM5pwWabn/\
KD9WQ4K8XISjRHOV0NnU4sLni4rAVIcxpNWNPixXg85PDqi6qtL1IW5g7WlSBLPBZJ+u9Y9DORYKka2\
Y/yOFB6YPufJ+sdZaGxQ8CvAWi2CvDcskQ=="
}
],

The keyID is any old GUID you can generate and isn’t anything to do with the cryptography. The customKeyIdentifier is the finger print of the X.509 certificate, and the value field contains the Base64 encoded PEM data for the certificate without its ASCII armour. The startDate and endDate fields have to match up with the similar lifetime validity timestamps minted into the certificate (the Azure AD management portal will barf on the upload if they aren’t).

One nice feature is that a single app can have multiple authentication methods available. Not only can you have more than one client ID/secret pair (which you need to have as they have a lifespan of at most 2 years, so every year you’ll need to generate a new one before the old one dies), but it appears that having the X.509 certificates in place does not stop the easier client ID/secret OAuth2 access from working.

OK, so lets have a bit of Perl that can get us a suitable Bearer access token once we’ve got the X.509 certificate stuffed in place inside the Azure app manifest:


#!/usr/bin/perl

# Script to test getting an OAuth2 access token using X.509 certificates.

use strict;
use LWP::UserAgent;
use Data::Dumper;
use JSON;
use JSON::WebToken;
use Crypt::Digest::SHA256;
$| = 1;

my $tenantUuid = ‘<Our Azure Tenant ID>’;
my $tokenEndpoint = “https://login.microsoftonline.com/$tenantUuid/oauth2/token”;

open(CERT, “cert.pem”);
my $cert = ”;
while(my $line = ) {
$cert .= $line;
}
close CERT;
open(KEY, “key.pem”);
my $key = ”;
while(my $line = ) {
$key .= $line;
}
close KEY;
my $fingercmd = ‘(openssl x509 -in cert.pem -fingerprint -noout) | sed \’s/SHA1 Fingerprint=//g\’ | sed \’s/://g\’ | xxd -r -ps | base64′;
my $fingerprint = `$fingercmd`;
chomp $fingerprint;

my $now = time();
my $expiryTime = $now+3600;
my $claims = {
‘aud’ => $tokenEndpoint,
‘iss’ => ‘< Our client ID for the app >’,
‘sub’ => ‘< Our client ID for the app >’,
‘jti’ => ‘< Our client ID for the app >’,
‘nbf’ => $now,
‘exp’ => $expiryTime,
};

my $signedJWT = JSON::WebToken->encode($claims, $key, ‘RS256’,
{‘x5t’ => “$fingerprint”},
);
my $authorizeForm = {
grant_type => ‘client_credentials’,
client_id => ‘< Our client ID for the app >’,
resource => ‘https://outlook.office365.com’,
scope => ‘Group.ReadWrite.All’,
client_assertion_type => ‘urn:ietf:params:oauth:client-assertion-type:jwt-bearer’,
client_assertion => $signedJWT,
};

my $ua = LWP::UserAgent->new;
$ua->timeout(10);
my $response = $ua->post( $tokenEndpoint, $authorizeForm);
if (!$response->is_success) {
warn “Failed to get access token: ” . $response->status_line . “\n”;
die “Response dump:\n\n”. Dumper($response) . “\n”;
}

my $json = JSON->new->allow_nonref;
my $oauth2_info = $json->decode( $response->decoded_content );

print Dumper($oauth2_info);

The $oauth2_info structure contains the required access token, plus its expiry information and a few other bits and bobs. The access token is used with SOAP requests by adding an HTTP Authorization header contain the the word “Bearer”, a space and then the access token as returned (the access token will be a Base64 encoded JWT itself).  If you need the WSDL file for the SOAP requestss, you can get it from https://outlook.com/ews/services.wsdl (though note you’ll need to authenticate to get it!).

One last nuance: for Office365 you seem to need to tell it what domain its talking to. I don’t know why – once it has decoded and verified the authorization bearer access token you’d think it should know what client ID your using, and thus what Azure AD domain it is in. It doesn’t.  So, you need to add another HTTP header called “X-AnchorMailbox” that contains an email address of a person/resource in the domain you’re playing with.  Once that’s there alongside the Authorization header with the Bearer access token, you’re good to go with some SOAPy EWS requests.

Shibboleth, APIs, CORS and guest access

I’m going to start this blog post with a “user story” – the sort of thing that we use to shape systems design.  Then I’ll talk about one aspect of the design that this user story gave rise to, and the resulting fun with hacking on Shibboleth and cross site scripting. But first the user story:

User story

We have computer labs on campus, some of which are public (any members of the institution can use them) and some of which are “private” – only available for staff and students in certain groups (departments or modules for example). The campus is large, with long walks between buildings so students (and to some extent staff) would like to know which labs have machines that are available for them to drop in and use.  To complicate matters some labs are also bookable for classes, during which time no machines are available for drop in use.

The University is also very keen on using single sign on technologies to minimise the number of times that our users are prompted for their username and password.  We use Shibboleth and simpleSAMLphp to provide this on campus, and where possible new services should make use of this technology and avoid popping up unnecessary log in dialogues.

In this case we would like to provide a view of machine availability in the public labs for people that have not authenticated, and a tailored view for people that have got an existing Shibboleth session running.  We also need to make this available in a dynamic HTML page using RESTful APIs because some departments may wish to take the data and mash it up into their own displays and reporting systems.

Shibboleth and APIs

OK, so that’s our user story – the reason why we’re going to need to write some code. Most of the API details aren’t important here – they just talk to back end databases that are populated regularly with details of labs, machine availability and bookings. The APIs then format the data into some nice JSON output that the Javascript on the client can turn into pretty HTML.

However we need to tailor the output for the user if they have already authenticated and have active Shibboleth sessions running so that we can show them specific information about the private labs they have access to.  To do this from client side Javascript is we need to know what username (if any) a Shibboleth session is associated with, so that we can then provide a list of the labs that this person has access to using other API calls.

The obvious first approach was to write a simple CGI API script on a web server that has Apache and mod_shib installed.  The CGI script would be called from the client side Javascript and would get the user’s eppn or cn details. These come from the environment variables that mod_shib provides. The CGI script would return them in a JSON structure for the client side code to then use.  The resulting script is quite simple:

#!/usr/bin/perl
use strict;
use JSON;
print "Content-type: application/json\r\n\r\n";
my $output = {};
foreach my $env_var ('cn', 'eppn') {
  if($ENV{$env_var}) {
    $output->{$env_var} = $ENV{$env_var};
  }
}
my $json = new JSON;
print $json->pretty->encode($output);

The first problem with this is that we also need to support people who aren’t logged in. This appeared to mean that we couldn’t use the common Apache mod_shib config that we use with our other server side Shibbolized CGI script:

<Location /cgi-bin/somewhere/whoami>
  AuthType shibboleth
  ShibRequestSetting requireSession 1
  require valid-user
<Location>

Not to worry though: reading the Shibboleth documentation there is an option for “passive” or “lazy” authentication. This means that if a Shibboleth session is active, mod_shib makes use of it to fill in the environment variables with user details as before and approves running the CGI script. Otherwise it just passes authentication back to Apache which can then run the CGI script without the additional Shibboleth variables in the environment. All we need to do is remove the “require valid-user” and change the 1 to a 0 for the requireSession setting. Sounds just what we want, right?

Wrong. What passive Shibboleth authentication lacks is the ability to check with the IdP if there is an existing Shibboleth session known to the web browser that wasn’t made to our web server. Effectively it allows “guest” access to the CGI script, with the option of going through an manual IdP login process if the user wishes to for that one site. Not that it really matters, as it soon became apparent that there were other issues with doing Shibbolized API calls from Javascript.

XMLHttpRequest and CORS

OK, so passive authentication in Shibboleth isn’t going to help much here. Lets step back a moment, and put the normal, non-passive mod_shib configuration shown above back in place. If the user has a valid Shibboleth session running, this should give us their user details, otherwise they’ll get an HTML page from the IdP asking them to log in.

However, we want to use this CGI script as an API from Javascript, so we’re going to be calling it using the XMLHttpRequest object’s methods. Maybe we could make the call and then see what the returned document is? If its JSON with cn or eppn details we know the user is logged in via Shibboleth. If its an HTML page of some sort, its probably a login or error page from the IdP intended to be displayed to the user, so we know they aren’t logged in.

Now, when we call the API CGI script from XMLHttpRequest we’re actually going to end up with a set of HTTP 302 redirects from the API’s server to the IdP server and possibly back again. Effectively one call to a Shibbolized resource may end up as multiple HTTP transactions. This is where Shibboleth stops playing nicely because of cross domain security in Javascript in web browsers:

  1. Cookies can not be set on the request, and often don’t propagate across the 302 redirects if a server attempts to set them with a Set-Cookie: HTTP header.
  2. We can’t intercept any of the 302 redirects in Javascript to try to inject headers or cookies. The browser will do those redirects itself until it hits of 200, 500, 403, etc response from a web server.
  3. By default, XMLHttpRequest ignores the output if the responding server doesn’t match the Origin of the request (ie the server where the Javascript came from originally).

W3C have been working on Cross-Origin Resource Sharing (CORS) technologies.  These can help with some of these issues. For example web servers can issues a Access-Control-Allow-Origin HTTP Header which says which allows suitably equipped modern browsers to over come the Origin checking.  However these are limited: your server can only have one Access-Control-Allow-Origin header value, otherwise browser Javascript interpreters will throw an error.  You can specify “*” for the Access-Control-Allow-Origin header value which gives a wild card match against any Origin, but we found that if you do that browsers then disallow the passing of credentials (including cookies).

So, calling a Shibbolized API from XMLHttpRequest looks like a non-starter. Every time a hand seems to reach out to help us, another hand comes along and slaps us down.  We need to be sneakier and… well, cruftier.

Evil iframe Hacking

Let me just say up front: iframes are ugly, are a hack and I’d rather not use them.

However they do offer us the sneaky solution to this problem in that they don’t appear to have some of the restrictions that the XMLHttpRequest calls do.  Specifically they appear to set cookies for a remote web server based on ones know to the browser and also honour cookie setting during HTTP 302 redirects.

What we can do is create a hidden iframe dynamically using client side Javascript, set an onLoad() handler function up and then point the iframe at our Shibboleth protected API CGI script. It will then do the 302 redirection chain to the IdP and possibly back to the API script and the iframe contents will end up as either a bit of JSON, or the HTML for the login error page from the IdP. In other words unlike XMLHttpRequest, the iframe behaves much more like the web browser session the user experiences.

Our onLoad() handler function can then use this to determine if the user is logged in to Shibboleth or not. There is one more “gotcha” though, and again its related to cross site scripting protection in browsers. If we get a resource in an iframe that comes from the same server as the page that the Javascript was included in, we can peer into the contents of that iframe using Javascript object calls. However if the iframe is filled from another server, our Javascript in the client can’t fiddle with its contents. There’s a good reason for this: you don’t want naughty people including your banking site inside an iframe and then extracting out your account details as you’re using it. This also applies if we request a resource from our server in the iframe but due to HTTP 302 redirects the final document comes from a different server (as will happen if a user who is not logged in gets sent to our IdP).

Luckily, in our case we’ve got one hack left up our sleeve. If we try to access the iframe contents that have come from the IdP (which isn’t the server we put in the src attribute to the iframe), Javascript in the browser throws an error. However we can use the try-catch error handling mechanism to grab this error. As it only happens when we’ve got a document that hasn’t come from our CGI API script (assuming our CGI API is hosted on the same server as the HTML and Javascript came from), then we know that at that point the user isn’t logged in with a Shibboleth session. We don’t need to see the IdP’s document – the fact that we can’t see it tells us what we need to know.

And we’re there! We can finally have client side Javascript that can deduce whether or not the user’s browser has had any Shibboleth session with our IdP open and if so can find out what the cn or eppn for the user is. Just for completeness, here’s a test HTML document with embedded Javascript to show that this works – you’ll need to serve it from the same web server as the Perl API CGI script above and modify the iframe.src accordingly.


<html>
 <head>
  <title>Javascript playpen</title>
 </head>
 <body>
  <button type="button" onclick="checkIdp()">Test against IdP</button>
  <p id="response"></p>
  <script>
function IsJsonString(str) {
  try {
    JSON.parse(str);
  } catch (e) {
    return false;
  }
  return true;
}
function checkIdp() {
  document.getElementById("response").innerHTML = '';
  var iframe = document.getElementById("iframe");
  if(!iframe) {
    iframe = document.createElement('iframe');
    iframe.id = "iframe";
  }
  iframe.innerHTML = '';
  iframe.onload = function() {
    var iframe = document.getElementById("iframe");
    try {
      var text = iframe.contentDocument.body.innerText ;
    } catch (e) {
      document.getElementById("response").innerHTML = 'Not logged in';
      return;
    }
    if(IsJsonString(iframe.contentDocument.body.innerText)) {
      var res = JSON.parse(iframe.contentDocument.body.innerText);
      document.getElementById("response").innerHTML = 'Logged in as ' + res.cn;
    } else {
      document.getElementById("response").innerHTML = 'Not logged in';
    }
  };
  iframe.hidden = true;
  iframe.src = "https://www.example.org/cgi-bin/ssocheck/whoami";
  document.body.appendChild(iframe);
  iframe.src = iframe.src;
}
  </script>
 </body>
</html>

Adding a secure SIP phone to CUCM using AXL

Warning: This is going to be a bit of a long rant about Cisco AXL API hacking for SIP phones. If you’re not interested in that, stop now! If you are wrestling with this though you might want to pour a hot drink and read through this as its not been as obvious as you’d imagine, especially if you have CUCM version 8.6.x.

I’ve been tasked with a bit of hacking on the Cisco Unified Communications Manager (CUCM) VoIP phone system that we have here at Loughborough. We mostly use Cisco wired phones on campus (using SCCP) but we’ve had lots of requests for DECT wireless phones to be exported. Now Cisco produce a DECT wireless handset and basestation, but it uses SIP to connect the phone to the CUCM servers. My job was to provide a neater workflow for our phone management chaps to add new DECT basestations and handsets to the system, as the manual process is rather involved (you have to set up provisioning files for the phone as well as set up CUCM using many point-n-click web delivered GUI steps to have suitable users and phone devices configured). They just want one CGI script where they can specify all the required information and it will just go and do it for them.

Part of this automated system is using Cisco’s AXL API to create a new user and phone in CUCM. I’ve used AXL in read only mode quite a bit before to help extract management information from CUCM for the phone folk, but this is the first time I’ve really used it in anger for creating new objects in CUCM. Still, its just a SOAP API, I’ve used Perl’s SOAP::Lite quite a bit before and there’s documentation available from Cisco on all the AXL versions, so this should be easy, right?

Wrong. Well, more specifically, most of it was easy but I came unstuck on one specific item that wasted hours of my time. I found I could use the addUser and addPhone AXL methods to create a new user (with digest credentials) and a new phone OK. What didn’t work was adding the “digestUser” element in the addPhone method. This specifies a user object that will be used by CUCM to supply the SIP security digest credentials to allow secure SIP to be used (which we want as we don’t want random unauthenticated SIP devices rocking up on our phone system!). The addPhone method “worked” in that it created the new phone, but checking in the CUCM web management pages should that the newly minted phone had a digest user of “None”. In other words AXL had quietly ignored the digestUser information without any errors or warnings. Grr!

At first I thought I was possibly passing the wrong data into AXL in the digestUser field. I’d assumed that it was the user’s userid, but maybe it should be the GUID (pkid, UUID, call it what you will)? I tried various guesses without success. Cisco’s AXL documentation isn’t terribly helpful either as it just tells us that digestUser is a 255 character string that only applies to SIP phones. Thanks!

Next I tried to find out where this information is stored in the CUCM database using the AXL SQL methods. The bad news was that digestUser isn’t just a foreign key in the device table. The CUCM 8.6.1 Data Dictionary document also didn’t really help too much. Eventually I tracked it down to the enduserdevicemap table entries that have a tkuserassociation value of 3, which according to the typeuserassociation table is “Digest In”. Great! Now how do I set values in this table via non-SQL AXL calls? Ah, you can’t directly as AXL abstracts the underlying database. The only way to tinker with a particular table via AXL is to use the SQL calls, and Cisco discourage those as they reserve the right to completely change the underlying data dictionary between CUCM versions. I bet they’d be even less happy to support CUCM installations that have down insert/update using SQL calls.

So back to trying to work out why the addPhone call was ignoring digestUser. After much hacking I think I’ve found out why: I’d been explicitly specifying AXL version 8.5 in the “uri” method to the Perl SOAP::Lite new constructor call. Cisco documentation on AXL versioning appears to say that the SOAPAction header sent with the SOAP request shouldn’t be in a URL format (which is SOAP::Lite’s default and has worked for all the other AXL calls I’ve made) but should instead look like “CUCM:DB ver=8.5”. I put this in and SOAP request start to fail. WTF?

After a bit of playing, I tried to request an older version of AXL by setting the SOAPAction header to “CUCM:DB ver=7.1”. You also need to use the on_action() method in SOAP::Lite to generate this header, because the delimiter between the “uri” and the SOAP method being called is a space, rather than SOAP::Lite’s default hash (#) and you still need the URI version in the XML namespacing in the SOAP request. Doing this meant that the addPhone now worked again – which was a bit odd as we’ve got CUCM version 8.6.x so the latest AXL version should be 8.5. A quick check in the CUCM web interface then showed even more good news: the digestUser was now filled in correctly! Hoorah!  It turns out that my original guess that digestuser should be the userid of the enduser object containing the digest credentials was correct after all.

For folk who might be doing this in the future, here’s an extract of the SOAP code that works:
my $cm = new SOAP::Lite
encodingStyle => '',
uri => 'http://www.cisco.com/AXL/API/7.1',
trace => 1,
proxy => "https://$cucmip:$axl_port/axl/" ;
$cm->on_action(sub { '"CUCM:DB ver=7.1 ' . $_[1] . '"' });

my $digestUser = 'rsrc.sp.000011116666'; # The userid of the already created enduser object containing the digest credentials.
my $pt = SOAP::Data->name('newPhone' =>
\SOAP::Data->value(
SOAP::Data->name('name' => $name),
SOAP::Data->name('description' => $descr),
SOAP::Data->name('devicePoolName' => $devicePool),
SOAP::Data->name('model' => $model),
SOAP::Data->name('product' => $model),
SOAP::Data->name('protocol' => $protocol),
SOAP::Data->name('subscribeCallingSearchSpaceName' => $subscribeCSSName),
SOAP::Data->name('digestUser' => $digestUser),
SOAP::Data->name('sipProfileName' => $sipProfileName),
SOAP::Data->name('class' => 'Phone'),
SOAP::Data->name('securityProfileName' => 'Third-party SIP Device Advanced - Standard SIP Secure Profile'),
),
);
my $som = $cm->addPhone($pt);
my $refResult;
if ($som->fault) {
warn "Error: ", $som->faultstring, "\n";
return undef;
} else {
$refResult = $som->valueof('//addPhoneResponse/return');
}

So I’ve now progressed to the point that I can start to take this code and glue it together with all the other steps in this process (such as adding lines to this new phone and configuring the physical device with the new SIP digest credentials).  Still, its taken me far longer than I’d expected and I’ve still no idea why the AXL version 8.5 requests ignored the digestUser initially and then failed when I gave them the “correct” format of the SOAPAction header.  It has contributed to my dislike of SOAP though: this would be so much clearer and easier if Cisco used a RESTful interface and had documentation more like Google provide for their calendar and drive APIs.  Live and learn, eh?

Talking to Nessus 6 API

Nessus 6 has an exciting new API…. which means that systems that rely on the old XML API and things like Perl modules to encapsulate it are going to take a bit of work to port to the brave new world.  My chum Niraj is looking at doing that here, but wanted an example of the new API in use that he could build on.  Luckily I’ve done more Perl API hacking with JSON than a person should admit to, so it didn’t take long to knock one up for him.  I thought I’d share it here for other people’s edification (and also to stop Gary, my boss, saying that I don’t blog enough).

Hopefully the comments will help explain what is going on, but the over view is that the code is in two parts really. The first part creates a session for a given username and password. This gets given a token by the Nessus API server to say, “Yes, you’ve logged in”. This token is then used in a Custom HTTP Header in the second part of the example to request a list of scans. These come back in JSON format so we turn them into a Perl data structure using the JSON.pm Perl module and then do whatever funky thing we intended to do with the data. I hope that’s clear! 🙂

#!/usr/bin/perl

use strict;
use LWP;
use LWP::UserAgent;
use JSON;
use Data::Dumper;

# This line is a hack to deal with the duff SSL certificates on the test server
BEGIN { $ENV{PERL_LWP_SSL_VERIFY_HOSTNAME} = 0 }

# Where we talk to
my $apibaseurl = 'https://nessus.example.com:8034/';

# Get the username and password to use
my $username = shift || 'mrtester';
my $password = shift || 'testytesting123';

# Create a user agent (web browser) to talk to the Nessus server
my $ua = LWP::UserAgent->new;
$ua->agent("LboroScanHack/0.1");

# Create the POST request that encodes the username and password
my $req = HTTP::Request->new(POST => $apibaseurl . 'session');
$req->content_type('application/x-www-form-urlencoded');
$req->content("username=$username&password=$password");

# Make the request of the Nessus server
my $res = $ua->request($req);

# See if it worked and if so, get the session token
my $NessusToken = '';
if ($res->is_success) {
my $result = from_json($res->content);
$NessusToken = $result->{'token'};
} else {
print $res->status_line, "\n";
print $res->content;
print "\n";
exit;
}
print "Got a token of $NessusToken\n";

# OK, at this point we have a valid session token. We can now use this
# to make more requests of the Nessus server. Lets get a list of scans as
# an example. For these we're going to need to create a custom HTTP Header
# in the request called X-Cookie that includes the token we've just got.

my $h = new HTTP::Headers;
$h->header('X-Cookie' => "token=$NessusToken;");

# Now create a new HTTP request object for the method/URL we want that
# includes this custom header
$req = HTTP::Request->new('GET' , $apibaseurl . 'scans', $h);
$req->content_type('application/json; charset=UTF-8');

# Make the request to the server including the token.
$res = $ua->request($req);

# Didn't work? Explain why and exit.
if (!$res->is_success) {
warn $res->status_line, "\n";
warn $res->content . "\n";
exit;
}

# Still going so the request worked - convert the JSON content into a Perl
# data structure.
my $scandata = from_json($res->content);

# Print it out
print Dumper($scandata);

# Do some funky stuff with the data
foreach my $thisfolder (@{$scandata->{'folders'}}) {
print "$thisfolder->{'name'} is a $thisfolder->{'type'} with ID $thisfolder->{'id'}\n";
}