The Fast and the Furious: One click quick tickets for RT

Jon and I have blogged before about some of the ways we’ve extended Best Practical’s Request Tracker (RT) to add functionality, but we’ve not really talked about how we enhance what’s already there. In this case we wanted to have a way to handle high volume, repeat tickets. We’re not that interested in who has the problem, more how many times it’s coming up, where it’s being seen and when.

Freshers week

The annual Freshers Week (which tends to last somewhat longer than a week) sees about 5,000 new students arrive and some 10,000 returners. This leads to a spike in work requests, mainly (but not exclusively) around getting devices connected to our wireless network. In this case, we are pretty sure we know what requests are going to arrive, but we want to be sure we are adequately setup to cope with the busiest periods. In order to measure demand, we need a system that is as quick as recording a pen stroke for a 5-bar gate. Alongside this we run kiosks for the students around the campus, these can be anything from a dedicated desk, to a throw-up tent. A secondary requirement was to find out which of these kiosks, were the most popular and have them correctly staffed to meet demand.

To this end a quick ticket system was developed, from the systems already implemented within RT, which recorded a minimum amount of data in the shortest time possible.

Fig 1: Freshers Week Quick Ticket Portlet

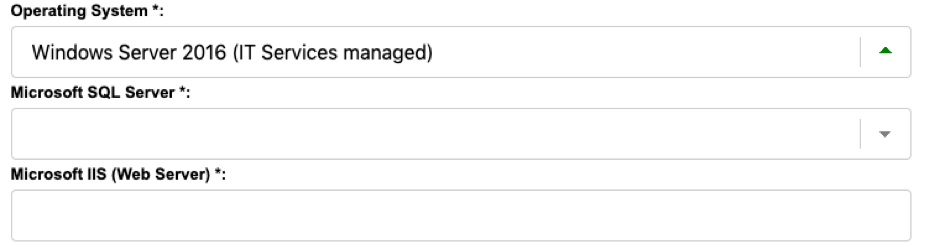
There are two parts to the ticket portlet. The first is capturing the kiosk number. As a stint at a kiosk was normally a few hours, we wanted to have our staff set their location once and have the portlet remember it for the duration of the session. This is achieved by a simple numerical dropdown html form field (as an RT Custom Field) and the use of browser localStorage, via javascript.

<script>
    jQuery(document).ready(function(){
        jQuery('#kioskNumber').change(saveSettings);
        loadSettings();
    });
    function loadSettings() {
        jQuery('#kioskNumber').val(localStorage.Kiosk);
        jQuery('input[name="Object-RT::Ticket--CustomField:Kiosk-2-Value"]').val(jQuery('#kioskNumber').val());
    }
    function saveSettings() {
        localStorage.Kiosk = jQuery('#kioskNumber').val();
        jQuery('input[name="Object-RT::Ticket--CustomField:Kiosk-2-Value"]').val(jQuery('#kioskNumber').val());
    }
</script>

The above javascript stores the kiosk choice in the browsers storage and recalls it every time the page is reloaded.

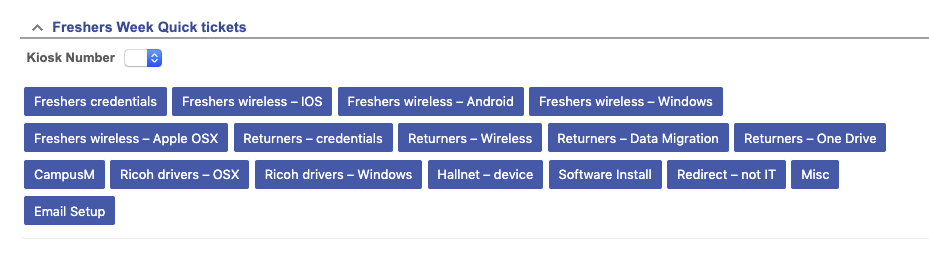
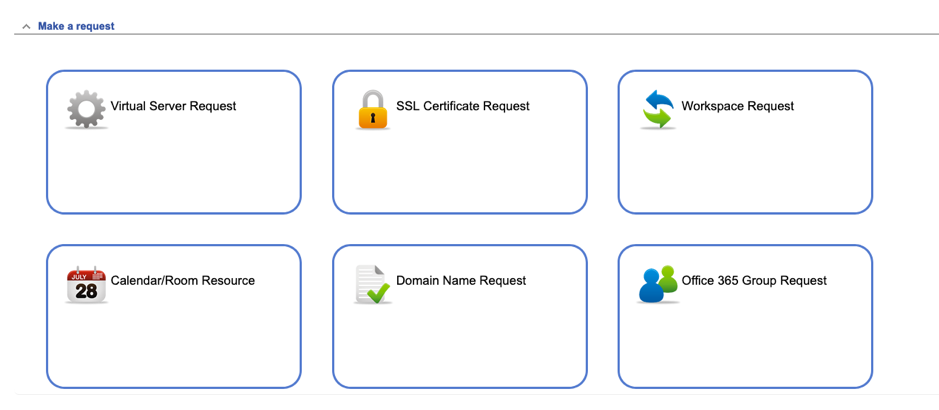
Once we had a method of recording the kiosk number, we then needed a set of buttons to record the issues. These buttons and the kiosk dropdown, feed into the form to create the ticket.

The ticket data is formed of a prescribed subject, a status of resolved, who created the ticket and when it was done.

% my $prefix = '[Freshers Week] ';
% my @subjects = (‘My’, ‘array’, ‘of’, ‘subjects’);
% foreach my $thisSubject (@subjects) {
<form
    method="post"
    action="<%RT->Config->Get('WebPath')%><% $r->path_info %>"
% $m->callback(CallbackName => 'InFormElement');
>
<input type="hidden" class="hidden" name="QuickCreate" value="1" />
<input type="hidden" class="hidden" name="Queue" value="3" />
<input type="hidden" class="hidden" name="Subject" value="<%$prefix%><%$thisSubject%>"/>
<input type="hidden" class="hidden" name="Owner" value="<%$session{'CurrentUser'}->id%>" />
<input type="hidden" class="hidden" name="Requestors" value="<%$session{'CurrentUser'}->EmailAddress%>" />
<input type="hidden" class="hidden" name="Object-RT::Ticket--CustomField:Kiosk-2-Value-Magic" value="1" />
<input type="hidden" name="Object-RT::Ticket--CustomField:Kiosk-2-Value" id="Object-RT::Ticket--CustomField:Kiosk-2-Value" class="CF-2-Edit" value="1" />
<input type="hidden" class="hidden" name="Status" value="resolved" />
<& /Elements/Submit, Label => loc("$thisSubject") &>
</form>

The above code will create a ticket in queue 3, via the QuickCreate method, as used by RT’s default quick ticket creator. Using this method, we are able to create tickets at the push of a button, the QuickCreate method does not take you to a new page, instead it simply acknowledges the creation of the ticket and refreshes the page the portlet is on, as seen below:

Fig 2: A ticket has been created and resolved. The interface acknowledges the ticket and the portlet is ready for the next case

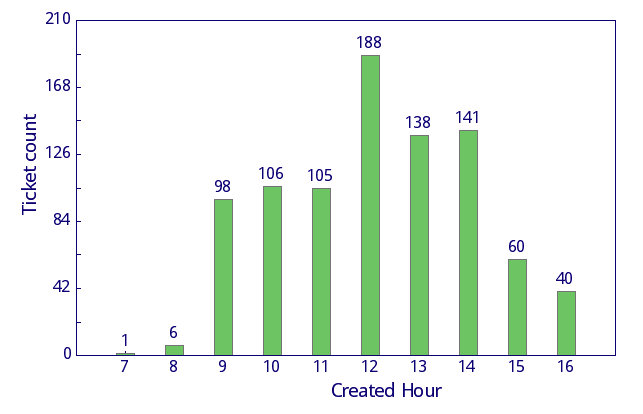
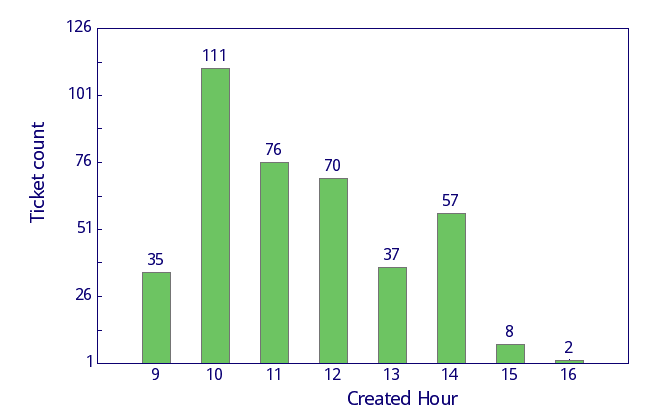
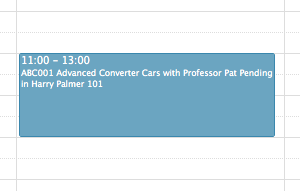
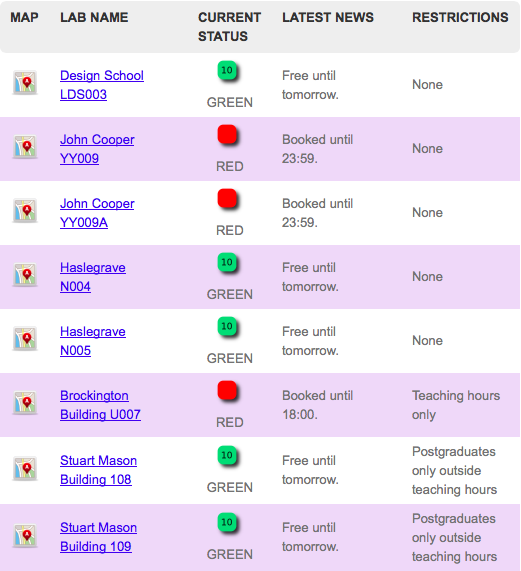
We can now take the data that is created and report back on the busy periods at any of the kiosks (see figures 3 and 4), to allow us to plan ahead for the next academic year, in terms of how we staff our kiosks and where we place them.

Fig 3: Mapping of the hourly demand at kiosk1, across the entirety of Freshers Week
Fig 4: The same search at kiosk2, showing a different demand pattern

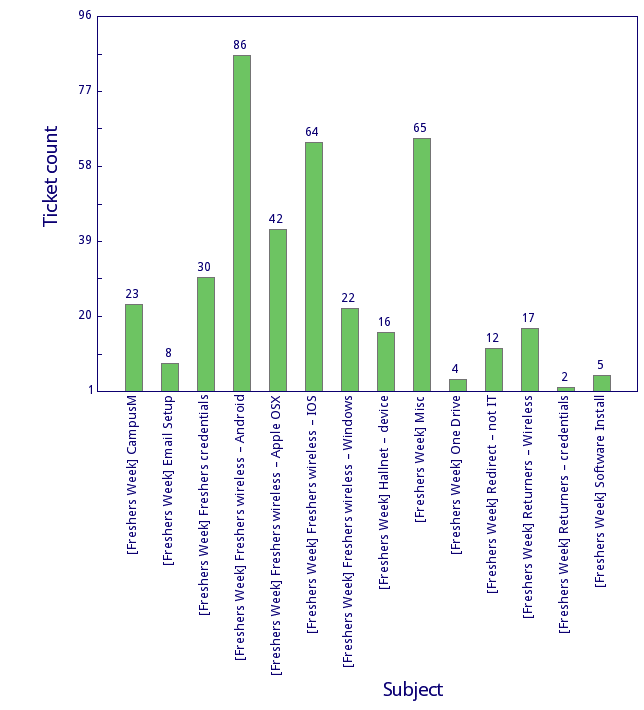
Further we can use the same data these tickets are generating to see what the major requests are (via the prescribed subject line) and if necessary have more specialised staff on hand (or target training for our current staff) in future years, to help manage the demand. In order to achieve this a slight modification to the dropdown list on RT’s chart form is needed, to add the option for “Subject”

Fig 5: Demand by subject at a kiosk, throughout Freshers Week

Day to Day on the PC Clinic

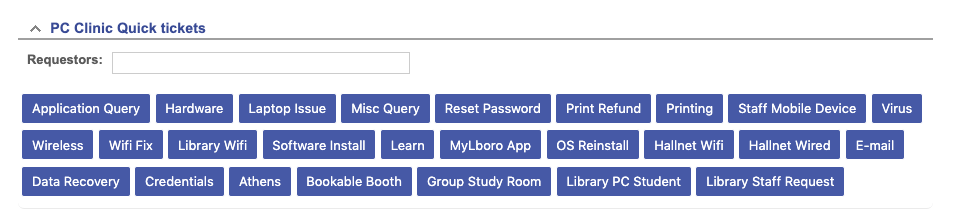
These quick tickets proved so popular and useful we were asked to extend them, to deal with regular requests outside of Freshers Week, during normal term time. As with the Freshers Week tickets, the requirement for single click 5 bar gate style recording was kept. In the case of the term time tickets its was requested that we have a method for recording who has the issue.

In this case we modified another piece of existing RT code to create a new portlet, that has many of the similarities of the Freshers Week array, but also includes a user lookup (the thinking here is to try and find people who may be having recurring problems)

<table>
  <tbody>
    <tr class="input-row">
    <td class="label"><&|/l&>Requestors</&>:</td>
    <td colspan="3" class="value"><& /Elements/EmailInput, Name => 'Requestors', id => 'Requestors', Size => '40', Default => $args->{Requestors} || $session{CurrentUser}->EmailAddress, AutocompleteMultiple => 1 &></td>
    </tr>
  </tbody>
</table>

This addition along with a few minor teaks to the form code, to allow a different list of issues and to detect the requestor, allows us to continue using these quick tickets on our permanent PC Clinic, throughout the year.

Fig 6: The portlet for day to day Quick Tickets

This method of recording tickets has proven itself to be able to handle large amounts of cases at the busiest times of the year and is providing our management with useful data, to enable future planning to make sure we provide our staff and students with an excellent user experience. It would appear that the RT service owner is certainly happy with them, based on the amount of chocolate biscuits we’re receiving.

Posted in RT

Implementing request management in RT: Quest for the shopping cart, part 1

We returned to Best Practical’s Request Tracker (RT) as our service management tool, last year, with a remit to provide 3 processes which, when combined, would give us a workable service management system and allow our processes to expand and mature:

  • Incident Management – raise a ticket to handle an issue and have it dealt with, which is pretty much RT OOTB.
  • Change Management – controlling and standardising changes in the organisation (As recently blogged about by Jon here).
  • Request Management.

I’m defining Request Management in the following manner:

A Request is a repeatable, standardised method for acquiring something, that produces information in a known structured format that can be acted upon and which can have restricted access.

With this definition in mind, and assuming that different requests will have differing requirements (in terms of data captured and who can make the request) we will need to look for something that:

  • For requestors, is easy to find, accessible and can glean the information required from them without causing confusion.
  • For the teams acting on these requests, the data is complete and presented in the team queue within RT in a standard manner.
  • The ability to have some requests available inside RT and some outside of the system, yet still going into the system.

This post details the Loughborough IT Services Request methodology, provides a broad overview of how we went about implementing this in RT, shows off RT’s flexibility and looks at the directions we may be heading in the future

Implementing Requests at Loughborough

Our initial requirements were to produce a method to request two things:

  • Virtual Servers – built on the VMWare virtualisation platform, which can run a number of different operating systems and services. Some of these requests may require different hardware setups from the norm (more RAM, CPUs, storage etc), some could be windows servers which may, or may not then require SQL server or IIS Server or they could be Linux servers with IT Services standard build or built from a users ISO. Some may be for research by an individual, some may run university wide services. All of these options would need to be catered for. This request would go to our Infrastructure team queue.
  • TLS/SSL certificates, which is simply a case of getting a certificate signing request (CSR) and, if the domain name the certificate is for is not local to Loughborough University (i.e. not a lboro.ac.uk domain), a University charge code. This request would go to our Security team queue.

Both of these requests needed to be limited to being available to members of the RT Group “IT Services”

These two initial requests are polar opposites in the information they need, the TLS request requires, at most, three pieces of information whereas the Virtual Server request requires much more and has many bits of information that are dependent on other bits.

In order to collect this information we will need to modify the Create.html page where tickets are initially produced. We would normally do this via RT’s built in Custom Fields. However as all of the requests we will need to cater for are unique (and hence would need some of their own Custom Fields, which would lead to an ever expanding custom field list and tickets that are very hard to read) and have to go to specific queues and potentially move around other queues, Custom Fields would become unwieldy as they would have to exist for all tickets in a team queue. Should the ticket ever need to be moved to another queue, the custom field data could be obscured, unless that queue also has that Custom Field. We therefore decided a number of things

  1. We would create our own bespoke web forms inside RT based on Create.html
  2. We would use RT’s Menu system and RT’s Group system to restrict who can access the forms
  3. All data gathered by these forms would be processed and collated as the initial ticket content

TLS/SSL Requests

Starting with the simpler of the two forms, we created a copy of Create.html in [path/to/RT]/RT4/local/html/Ticket/ called CreateSSLRequest.html.

Figure 1: The TLS/SSL certificate request form.

The TLS/SSL request form is very simple. The only requirements we have are the CSR file which can be attached, as you would for a standard RT ticket and a charge code if you are not requesting the certificate for server with the university domain name. Figure 2 below shows how the form reacts if you change the “Yes” to a “No”. This is controlled by a simple piece of jQuery and CSS, slipped into the new CreateSSLRequest.html page and called as an onChange event.

function showChargeCode () {
  if(jQuery('select[name=\'Domain\']').val() == 'Yes') {
     jQuery('tr.chargeCode').css('display', 'none');
  } else {
     jQuery('tr.chargeCode').css('display', 'table-row');
  }
}
Figure 2: The form reacts to ask for additional information for this request.

Once the form is complete it can be submitted, where it is validated via javascript. This is fired from an onSubmit event (which submits to itself) collects the data and performs some simple tests to check there is something there. At this point you can add in as much validation as you need.

var domain = jQuery('select[name=\'Domain\']').val();
var chargeCode = jQuery('input[name=\'chargeCode\']').val();

if(domain == 'No' && chargeCode == '') {
alert("You must supply a charge code when acquiring a certificate for " +
"a non lboro.ac.uk domain");

return false;
}

Assuming all is well, the form can have all of its data bundled up and submitted as the RT ticket content, like this:

if(everythingIsOK) {
jQuery('input[name=\'Content\']').val('Some text etc etc ' + domain + chargeCode );

return true;
}

This submits the information with the attached CSR as a standard RT ticket into our Security Queue, where it can be worked on as normal.

The above TLS/SSL certificate request form is very simplistic, but should show how forms can be built inside RT without using the Custom Fields.

Virtual Server Request Form

The Virtual Server Request form is a different beast entirely, although as with the TLS/SSL form it starts off with a simple question, in order to check the requestor has performed the due diligence necessary before the request. In this case the first question is along the lines of “Do you have a way to support this server” (see Figure 3)

Figure 3: The initial view of the Virtual Server Request Form. As we are building standard html/jquery forms, we can add lots of things. This one has a tool tip on the element, identified by the orange circle with the “i” inside.

By selecting “Yes”, as with the previous form, new elements are now exposed to the requestor (see Figure 4).

Figure 4: The extended form, offering input and select boxes to control information.

The extended form contains various elements along with tool tips to guide the user. The operating system box makes use of RT’s Groups to decide what server options you can see. This is controlled by a mixture of Perl and html.

% my $groups = RT::Groups->new($session{'CurrentUser'});
% $groups->WithCurrentUser();
% $groups->LimitToUserDefinedGroups();
% while (my $group = $groups->Next()) {
%   if($group->Name eq 'Group A') {
%     $groupA = 1;
%   } elsif($group->Name eq 'Group B') {
%     $groupB = 1;
%   }
% }
%
% if($groupA) {
<option>Networks CentOS 7 template (Managed by requestor)</option>
% }

Once a server option is selected, as with the previous form, additional fields can be exposed to gather more specific data.

Figure 6: By requesting Windows Server 2016, the requestor is now presented with options for IIS and SQL Server.

This ability to hide and show fields in the form is controlled in the same way as the simpler TLS/SSL form and the data gathered is validated, dependencies are checked and the information is collated in the same way and sent to RT as a ticket. The content of the Virtual Server Request form arrives in RT and appears as the first content entry in a structured format. This method can be expanded to forms that don’t exist within RT and they can collate the information into an initial email, which can be posted into the system (of course these wont have the ability to use extra data like RT Groups). The initial information for a Virtual Server ends up in RT like the below:

VM Server Request

Has support contract: Yes
Licencing understood: Yes
Business case: Internal
Business case justification: I really really need it
Proposed server name: Foo
Replaces existing server?: Yes
Name of existing server being replaced: Bar
Server description: FooBar Application Server
Development or Production?: Production
Application services supported: FooBar reporting
Server manager username: dave
Other server contacts: jon,katy
Operating System: Windows Server 2016 (IT Services managed)
IIS Required: No

A future enhancement to this form, will be to use a Custom Field to hold the same data in the ticket in JSON format. This will allow us to access the data in a usable structure via RT’s REST APIs, to aid in the automation of server builds.

Accessing the Request forms

Forms setup in the above manner and placed where they are, are accessible to anyone who is a privileged user in RT. RT is built in such a way that menu options are available to privileged or unprivileged users or both. This is helpful to us as we can control access to which type of user has access to which sort of request. However, we wanted to go a stage further and restrict access to some of the forms, dependent on RT Groups.

We have many groups of users on RT that are privileged (IT Services folk, Printing folk, Financial Services folk etc etc). Only members of the IT Services Group should be able to see the two requests we have created, as we want to make sure we have continuity of support for any server we deploy. For this we can use exactly the same trick that we used on the Virtual Server Request Form to offer restricted access to different server options and present requests on a Group basis.

Two further requirements were the option to categorise our Requests and present them in a way that was easy to find and to display them more graphically, rather than in a nested menu structure. To this end, our scaling up plan will combine the usual drop down menus with RT, breaking requests into the various services they are for (e.g. IT Services requests, Printing requests, Library requests etc) and once this level is chosen, the  various requests that can be accessed, are displayed in a tabular format, as seen in Figure 7. 

Figure 7: Various request choices displayed within RT. Icon by Dryicons

Hang on, didn’t you say something about shopping carts??

Did I? Oh yes. If we break down the requirements of a shopping cart (and here I’m simplifying it to just be those items a user can request as hardware), what do we have?

  1. An ability to create forms that can capture the requests users will make – hopefully this blog has demonstrated this to some degree.
  2. An ability to know what we can request – We’ll be looking at this in the Summer when we attempt to integrate our Snipe-IT asset management system with RT. This will give us access to the complete range of hardware options a user could request
  3. A way to store my requests as a draft before I decide to purchase. Jon’s previous blog post about change, showed a change lifecycle with a draft status that works in this manner. Hypothetically we can create a queue with a lifecycle that only has the statuses of “draft”, “cancel”, and “purchase”, setup in such a way that only the owner can see their tickets in this queue. Any change of status away from draft kicks off actions that either move the ticket to a different queue that begins the purchasing process, or wipes it out.
  4. A way to add and take away options whilst in draft – this will require some thought and no doubt a bit of Perl/jQuery hackery, but the TicketSQL query builder has similar functionality in the way it adds and removes parts of the SQL query.
  5. Running totals – again this would depend on how well you’re managing the data for things that can be requested, but if its available it shouldn’t be too much of an issue to add in

A lot of these still need thought, but none would appear implausible and it’s the direction we’ll be heading over the next few months, as we begin to look at adding assets to our RT and what we can do by combining them with requests.

Timetables

Here at Middleware Towers, we were asked to look into providing students with access to their timetable, in a variety of methods. We have already blogged about inputting the data into google calendars, but for a variety of other applications we wanted a method that was lightweight and portable. We wanted to avoid being too heavily tied into the University’s systems, so we could give the methodology away without having to worry about bespoke parts.

JSON

Readers of our blog (you must be out there somewhere) will know we like JSON, we like it a lot, here’s why:

(JavaScript Object Notation) is a lightweight format based on the ECMA-262 standard. It is easy for humans to read and write. It is easy for machines to parse and generate and uses conventions that programmers using the “C” family of languages will be comfortable with. These properties combined with its universal data structures. make it an ideal data-interchange language.

Taking the module calendars we are already creating for our students google calendars, it was relatively trivial to also create JSON files of the same data (one per module, created by a script, controlled via Cron). These files would be in the following format:

[
   {
      "ROOMID_STR" : Harry Palmer 101,
      "MODULEID_STR" : "ABC001",
      "MODULENAME_STR" : "Advanced Converter Cars",
      "SLOTID" : "721",
      "STARTTIME" : "11:00",
      "ENDTIME" : "13:00",
      "LECTURER_STR" : "Professor Pat Pending",
      "DATECHANGED" : "201402140944",
      "MAPDATE" : "20-MAR-15"
   }
]

A further file per module would also be created, which would list those students registered on it. It takes the following format:

   {
      "j.bloggs@student." : [
      "ABC001",
      "ABC001 (B)"
   ]
}

The (B) indicates a cohort of the module, this is common practice if the module membership is large, it splits the students into smaller groups for such things as tutorials. We wanted our timetables to be fully personalised, so we also created JSON files for any cohorts a module may have.

Now we had the data in a format we could access and manipulate, we needed to find something which could present it to our students in a manner they were familiar with.

Fullcalendar

Fullcalendar is a jQuery plugin from MIT (who seem to produce an almost unending supply of these sorts of thing), It provides a well documented, AJAX based google calendar like environment. Its API is rich and it is easy to personalise the output. Some simple jQuery settings will allow you to control the default view and the type and position of controls and information:

header: {
        left: 'prev,next today',
	center: 'title',
	right: 'month,agendaWeek,agendaDay'
	},
editable: false,
firstDay: '1',
defaultView: 'agendaWeek',

This places the “<”, “>” and “today” buttons on the left, the month week and day button on the right and the title in the middle. It also makes it read only, sets the first day to monday and by default shows a week view (see fig 1)

fullcalendar
fig 1: Fullcalendar configured as above.

Provide the plugin with correctly formatted JSON, as below and you will get google calendar like output as seen in fig 2.

[
   {
      "title":"ABC001 Advanced Converter Cars with Prof Pat Pending in Harry Palmer 101",
      "end":"2015-03-20 13:00:00",
      "start":"2015-03-20 11:00:00”
   }
]

event

fig 2: Event output from JSON in Fullcalendar

Keen eyed readers will notice that the JSON required by Fullcalendar, doesn’t match the JSON we have in our module files. This would require some, on the fly, programatic manipulation via Perl (the one true language), to stitch together the lecturer, room, id and module name to form the “title” element. The datetime elements are formatted using perl’s localtime, split and join functions.

Putting it all together gives us a students personalised timetable in a portable format, that could be used for any of our applications (VLE, portal, student support systems etc) without any bespoke tie in to other systems.

A special thanks go to our IT support assistants (both past and present), for being willing guinea pigs and especially to Tom for remaining positive and optimistic, whilst we were destroying his google calendar setup on an almost daily basis.

Lab Availability

As part of the development of a student web information portal at Loughborough University a traffic light style widget, showing the usage of our computer labs, was posited. This would offer a number of advantages with students being able to chose the lab they would head towards by seeing those which were currently, or soon to be, booked and of the available ones which were busy.

Mash

The Active Directory (AD) was the first port of call for this. Each of our labs has their own organisational unit (OU), which contains all of the machines currently in the lab. The LDAP libraries of php could then be used to scoop up the AD computer object for each machine. An AD extension attribute on each managed computer was assigned and would contain binary data. 0 would indicate that the machine was not logged into and 1 would mean the machine was busy. Attribute control is handled by LDAP Modify commands that are run as part of the log on and off processes of the PC’s. By counting the number of zeros we could tell how many of a labs machines were currently free.

More mash

first_go

First attempt at the traffic light system

For those labs that are open access, the AD attribute control method offered all of the monitoring that was required. More work was required, however, on those labs that could be booked.

Therefore the second stage, was to question the University’s central timetabling system to see the status of the labs themselves. For this a database view was created, showing the status of the bookable labs throughout the day. SQL queries could now be sent to the view and the current and future status of the lab interpreted.

Mash with gravy

The Library uses a separate booking system (WUBS) for its seminar rooms and CAD lab. As these are not controlled from the central timetabling system, more mashup was required to connect to its API and once again poll for the daily booking data. Once this was achieved, it was simply a case of converting the WUBS API data into the same format as the central timetable data and output it all. This data could then be taken and combined with HTML5, to produce a unified traffic light display of availability throughout the campus (See our Digital Signage blog for the details).

pcAvailability

Pi and Mash. Raspberry Pi powered HTML5 mashup