Shibboleth, APIs, CORS and guest access

I’m going to start this blog post with a “user story” – the sort of thing that we use to shape systems design.  Then I’ll talk about one aspect of the design that this user story gave rise to, and the resulting fun with hacking on Shibboleth and cross site scripting. But first the user story:

User story

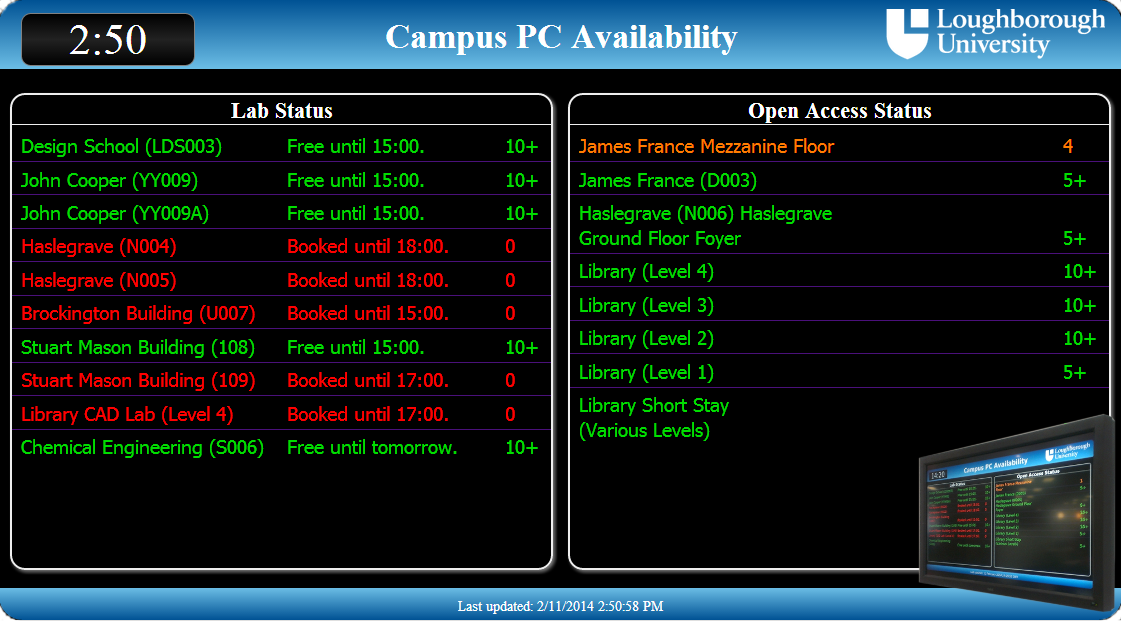
We have computer labs on campus, some of which are public (any members of the institution can use them) and some of which are “private” – only available for staff and students in certain groups (departments or modules for example). The campus is large, with long walks between buildings so students (and to some extent staff) would like to know which labs have machines that are available for them to drop in and use.  To complicate matters some labs are also bookable for classes, during which time no machines are available for drop in use.

The University is also very keen on using single sign on technologies to minimise the number of times that our users are prompted for their username and password.  We use Shibboleth and simpleSAMLphp to provide this on campus, and where possible new services should make use of this technology and avoid popping up unnecessary log in dialogues.

In this case we would like to provide a view of machine availability in the public labs for people that have not authenticated, and a tailored view for people that have got an existing Shibboleth session running.  We also need to make this available in a dynamic HTML page using RESTful APIs because some departments may wish to take the data and mash it up into their own displays and reporting systems.

Shibboleth and APIs

OK, so that’s our user story – the reason why we’re going to need to write some code. Most of the API details aren’t important here – they just talk to back end databases that are populated regularly with details of labs, machine availability and bookings. The APIs then format the data into some nice JSON output that the Javascript on the client can turn into pretty HTML.

However we need to tailor the output for the user if they have already authenticated and have active Shibboleth sessions running so that we can show them specific information about the private labs they have access to.  To do this from client side Javascript is we need to know what username (if any) a Shibboleth session is associated with, so that we can then provide a list of the labs that this person has access to using other API calls.

The obvious first approach was to write a simple CGI API script on a web server that has Apache and mod_shib installed.  The CGI script would be called from the client side Javascript and would get the user’s eppn or cn details. These come from the environment variables that mod_shib provides. The CGI script would return them in a JSON structure for the client side code to then use.  The resulting script is quite simple:

#!/usr/bin/perl
use strict;
use JSON;
print "Content-type: application/json\r\n\r\n";
my $output = {};
foreach my $env_var ('cn', 'eppn') {
  if($ENV{$env_var}) {
    $output->{$env_var} = $ENV{$env_var};
  }
}
my $json = new JSON;
print $json->pretty->encode($output);

The first problem with this is that we also need to support people who aren’t logged in. This appeared to mean that we couldn’t use the common Apache mod_shib config that we use with our other server side Shibbolized CGI script:

<Location /cgi-bin/somewhere/whoami>
  AuthType shibboleth
  ShibRequestSetting requireSession 1
  require valid-user
<Location>

Not to worry though: reading the Shibboleth documentation there is an option for “passive” or “lazy” authentication. This means that if a Shibboleth session is active, mod_shib makes use of it to fill in the environment variables with user details as before and approves running the CGI script. Otherwise it just passes authentication back to Apache which can then run the CGI script without the additional Shibboleth variables in the environment. All we need to do is remove the “require valid-user” and change the 1 to a 0 for the requireSession setting. Sounds just what we want, right?

Wrong. What passive Shibboleth authentication lacks is the ability to check with the IdP if there is an existing Shibboleth session known to the web browser that wasn’t made to our web server. Effectively it allows “guest” access to the CGI script, with the option of going through an manual IdP login process if the user wishes to for that one site. Not that it really matters, as it soon became apparent that there were other issues with doing Shibbolized API calls from Javascript.

XMLHttpRequest and CORS

OK, so passive authentication in Shibboleth isn’t going to help much here. Lets step back a moment, and put the normal, non-passive mod_shib configuration shown above back in place. If the user has a valid Shibboleth session running, this should give us their user details, otherwise they’ll get an HTML page from the IdP asking them to log in.

However, we want to use this CGI script as an API from Javascript, so we’re going to be calling it using the XMLHttpRequest object’s methods. Maybe we could make the call and then see what the returned document is? If its JSON with cn or eppn details we know the user is logged in via Shibboleth. If its an HTML page of some sort, its probably a login or error page from the IdP intended to be displayed to the user, so we know they aren’t logged in.

Now, when we call the API CGI script from XMLHttpRequest we’re actually going to end up with a set of HTTP 302 redirects from the API’s server to the IdP server and possibly back again. Effectively one call to a Shibbolized resource may end up as multiple HTTP transactions. This is where Shibboleth stops playing nicely because of cross domain security in Javascript in web browsers:

  1. Cookies can not be set on the request, and often don’t propagate across the 302 redirects if a server attempts to set them with a Set-Cookie: HTTP header.
  2. We can’t intercept any of the 302 redirects in Javascript to try to inject headers or cookies. The browser will do those redirects itself until it hits of 200, 500, 403, etc response from a web server.
  3. By default, XMLHttpRequest ignores the output if the responding server doesn’t match the Origin of the request (ie the server where the Javascript came from originally).

W3C have been working on Cross-Origin Resource Sharing (CORS) technologies.  These can help with some of these issues. For example web servers can issues a Access-Control-Allow-Origin HTTP Header which says which allows suitably equipped modern browsers to over come the Origin checking.  However these are limited: your server can only have one Access-Control-Allow-Origin header value, otherwise browser Javascript interpreters will throw an error.  You can specify “*” for the Access-Control-Allow-Origin header value which gives a wild card match against any Origin, but we found that if you do that browsers then disallow the passing of credentials (including cookies).

So, calling a Shibbolized API from XMLHttpRequest looks like a non-starter. Every time a hand seems to reach out to help us, another hand comes along and slaps us down.  We need to be sneakier and… well, cruftier.

Evil iframe Hacking

Let me just say up front: iframes are ugly, are a hack and I’d rather not use them.

However they do offer us the sneaky solution to this problem in that they don’t appear to have some of the restrictions that the XMLHttpRequest calls do.  Specifically they appear to set cookies for a remote web server based on ones know to the browser and also honour cookie setting during HTTP 302 redirects.

What we can do is create a hidden iframe dynamically using client side Javascript, set an onLoad() handler function up and then point the iframe at our Shibboleth protected API CGI script. It will then do the 302 redirection chain to the IdP and possibly back to the API script and the iframe contents will end up as either a bit of JSON, or the HTML for the login error page from the IdP. In other words unlike XMLHttpRequest, the iframe behaves much more like the web browser session the user experiences.

Our onLoad() handler function can then use this to determine if the user is logged in to Shibboleth or not. There is one more “gotcha” though, and again its related to cross site scripting protection in browsers. If we get a resource in an iframe that comes from the same server as the page that the Javascript was included in, we can peer into the contents of that iframe using Javascript object calls. However if the iframe is filled from another server, our Javascript in the client can’t fiddle with its contents. There’s a good reason for this: you don’t want naughty people including your banking site inside an iframe and then extracting out your account details as you’re using it. This also applies if we request a resource from our server in the iframe but due to HTTP 302 redirects the final document comes from a different server (as will happen if a user who is not logged in gets sent to our IdP).

Luckily, in our case we’ve got one hack left up our sleeve. If we try to access the iframe contents that have come from the IdP (which isn’t the server we put in the src attribute to the iframe), Javascript in the browser throws an error. However we can use the try-catch error handling mechanism to grab this error. As it only happens when we’ve got a document that hasn’t come from our CGI API script (assuming our CGI API is hosted on the same server as the HTML and Javascript came from), then we know that at that point the user isn’t logged in with a Shibboleth session. We don’t need to see the IdP’s document – the fact that we can’t see it tells us what we need to know.

And we’re there! We can finally have client side Javascript that can deduce whether or not the user’s browser has had any Shibboleth session with our IdP open and if so can find out what the cn or eppn for the user is. Just for completeness, here’s a test HTML document with embedded Javascript to show that this works – you’ll need to serve it from the same web server as the Perl API CGI script above and modify the iframe.src accordingly.


<html>
 <head>
  <title>Javascript playpen</title>
 </head>
 <body>
  <button type="button" onclick="checkIdp()">Test against IdP</button>
  <p id="response"></p>
  <script>
function IsJsonString(str) {
  try {
    JSON.parse(str);
  } catch (e) {
    return false;
  }
  return true;
}
function checkIdp() {
  document.getElementById("response").innerHTML = '';
  var iframe = document.getElementById("iframe");
  if(!iframe) {
    iframe = document.createElement('iframe');
    iframe.id = "iframe";
  }
  iframe.innerHTML = '';
  iframe.onload = function() {
    var iframe = document.getElementById("iframe");
    try {
      var text = iframe.contentDocument.body.innerText ;
    } catch (e) {
      document.getElementById("response").innerHTML = 'Not logged in';
      return;
    }
    if(IsJsonString(iframe.contentDocument.body.innerText)) {
      var res = JSON.parse(iframe.contentDocument.body.innerText);
      document.getElementById("response").innerHTML = 'Logged in as ' + res.cn;
    } else {
      document.getElementById("response").innerHTML = 'Not logged in';
    }
  };
  iframe.hidden = true;
  iframe.src = "https://www.example.org/cgi-bin/ssocheck/whoami";
  document.body.appendChild(iframe);
  iframe.src = iframe.src;
}
  </script>
 </body>
</html>

We’ve got an API…

APIs (application programming interface) are almost a way of life for us in MALS. They are an essential tool that allows us to exploit systems (I don’t mean in the sense of unfair or underhand access, but rather to derive maximum benefit from a system). However, time and time again we hit the problem of suppliers who proudly state they have APIs for their systems but when we ask to access them we find:

  • the APIs are unavailable to customers – but the supplier would be happy to do whatever development we were intending if we can provide them with a big bag of cash ($$$)
  • the APIs are undocumented – in other words no use at all
  • the APIs were documented – yeah! – about five years ago and despite the code being upgraded no one thought to do the same with the documentation – no!
  • the supplier is happy to provide access to the APIs for an additional charge
  • you need to attend a training course (and possibly be certified – I’ll let you decide on the definition) before you can access the APIs

<rant>
I can sympathise with suppliers not wanting people messing with their systems. However, if you say you provide APIs to access them then for goodness sake do so!
</rant>

Adding a secure SIP phone to CUCM using AXL

Warning: This is going to be a bit of a long rant about Cisco AXL API hacking for SIP phones. If you’re not interested in that, stop now! If you are wrestling with this though you might want to pour a hot drink and read through this as its not been as obvious as you’d imagine, especially if you have CUCM version 8.6.x.

I’ve been tasked with a bit of hacking on the Cisco Unified Communications Manager (CUCM) VoIP phone system that we have here at Loughborough. We mostly use Cisco wired phones on campus (using SCCP) but we’ve had lots of requests for DECT wireless phones to be exported. Now Cisco produce a DECT wireless handset and basestation, but it uses SIP to connect the phone to the CUCM servers. My job was to provide a neater workflow for our phone management chaps to add new DECT basestations and handsets to the system, as the manual process is rather involved (you have to set up provisioning files for the phone as well as set up CUCM using many point-n-click web delivered GUI steps to have suitable users and phone devices configured). They just want one CGI script where they can specify all the required information and it will just go and do it for them.

Part of this automated system is using Cisco’s AXL API to create a new user and phone in CUCM. I’ve used AXL in read only mode quite a bit before to help extract management information from CUCM for the phone folk, but this is the first time I’ve really used it in anger for creating new objects in CUCM. Still, its just a SOAP API, I’ve used Perl’s SOAP::Lite quite a bit before and there’s documentation available from Cisco on all the AXL versions, so this should be easy, right?

Wrong. Well, more specifically, most of it was easy but I came unstuck on one specific item that wasted hours of my time. I found I could use the addUser and addPhone AXL methods to create a new user (with digest credentials) and a new phone OK. What didn’t work was adding the “digestUser” element in the addPhone method. This specifies a user object that will be used by CUCM to supply the SIP security digest credentials to allow secure SIP to be used (which we want as we don’t want random unauthenticated SIP devices rocking up on our phone system!). The addPhone method “worked” in that it created the new phone, but checking in the CUCM web management pages should that the newly minted phone had a digest user of “None”. In other words AXL had quietly ignored the digestUser information without any errors or warnings. Grr!

At first I thought I was possibly passing the wrong data into AXL in the digestUser field. I’d assumed that it was the user’s userid, but maybe it should be the GUID (pkid, UUID, call it what you will)? I tried various guesses without success. Cisco’s AXL documentation isn’t terribly helpful either as it just tells us that digestUser is a 255 character string that only applies to SIP phones. Thanks!

Next I tried to find out where this information is stored in the CUCM database using the AXL SQL methods. The bad news was that digestUser isn’t just a foreign key in the device table. The CUCM 8.6.1 Data Dictionary document also didn’t really help too much. Eventually I tracked it down to the enduserdevicemap table entries that have a tkuserassociation value of 3, which according to the typeuserassociation table is “Digest In”. Great! Now how do I set values in this table via non-SQL AXL calls? Ah, you can’t directly as AXL abstracts the underlying database. The only way to tinker with a particular table via AXL is to use the SQL calls, and Cisco discourage those as they reserve the right to completely change the underlying data dictionary between CUCM versions. I bet they’d be even less happy to support CUCM installations that have down insert/update using SQL calls.

So back to trying to work out why the addPhone call was ignoring digestUser. After much hacking I think I’ve found out why: I’d been explicitly specifying AXL version 8.5 in the “uri” method to the Perl SOAP::Lite new constructor call. Cisco documentation on AXL versioning appears to say that the SOAPAction header sent with the SOAP request shouldn’t be in a URL format (which is SOAP::Lite’s default and has worked for all the other AXL calls I’ve made) but should instead look like “CUCM:DB ver=8.5”. I put this in and SOAP request start to fail. WTF?

After a bit of playing, I tried to request an older version of AXL by setting the SOAPAction header to “CUCM:DB ver=7.1”. You also need to use the on_action() method in SOAP::Lite to generate this header, because the delimiter between the “uri” and the SOAP method being called is a space, rather than SOAP::Lite’s default hash (#) and you still need the URI version in the XML namespacing in the SOAP request. Doing this meant that the addPhone now worked again – which was a bit odd as we’ve got CUCM version 8.6.x so the latest AXL version should be 8.5. A quick check in the CUCM web interface then showed even more good news: the digestUser was now filled in correctly! Hoorah!  It turns out that my original guess that digestuser should be the userid of the enduser object containing the digest credentials was correct after all.

For folk who might be doing this in the future, here’s an extract of the SOAP code that works:
my $cm = new SOAP::Lite
encodingStyle => '',
uri => 'http://www.cisco.com/AXL/API/7.1',
trace => 1,
proxy => "https://$cucmip:$axl_port/axl/" ;
$cm->on_action(sub { '"CUCM:DB ver=7.1 ' . $_[1] . '"' });

my $digestUser = 'rsrc.sp.000011116666'; # The userid of the already created enduser object containing the digest credentials.
my $pt = SOAP::Data->name('newPhone' =>
\SOAP::Data->value(
SOAP::Data->name('name' => $name),
SOAP::Data->name('description' => $descr),
SOAP::Data->name('devicePoolName' => $devicePool),
SOAP::Data->name('model' => $model),
SOAP::Data->name('product' => $model),
SOAP::Data->name('protocol' => $protocol),
SOAP::Data->name('subscribeCallingSearchSpaceName' => $subscribeCSSName),
SOAP::Data->name('digestUser' => $digestUser),
SOAP::Data->name('sipProfileName' => $sipProfileName),
SOAP::Data->name('class' => 'Phone'),
SOAP::Data->name('securityProfileName' => 'Third-party SIP Device Advanced - Standard SIP Secure Profile'),
),
);
my $som = $cm->addPhone($pt);
my $refResult;
if ($som->fault) {
warn "Error: ", $som->faultstring, "\n";
return undef;
} else {
$refResult = $som->valueof('//addPhoneResponse/return');
}

So I’ve now progressed to the point that I can start to take this code and glue it together with all the other steps in this process (such as adding lines to this new phone and configuring the physical device with the new SIP digest credentials).  Still, its taken me far longer than I’d expected and I’ve still no idea why the AXL version 8.5 requests ignored the digestUser initially and then failed when I gave them the “correct” format of the SOAPAction header.  It has contributed to my dislike of SOAP though: this would be so much clearer and easier if Cisco used a RESTful interface and had documentation more like Google provide for their calendar and drive APIs.  Live and learn, eh?

Identifying multibyte UTF-8 characters in PostgreSQL

This afternoon I had to find a quick way to identify which rows in a PostgreSQL table had multibyte UTF-8 characters in it.  Luckily PostgreSQL supports a number of string functions one of which is char_length, which returns the number of characters in a string.  Another one is octet_length which returns the number of bytes in a string.  For standard ASCII strings these will be the same but for any strings containing multibyte UTF-8 characters, these will differ.  Using these functions I ended up with some SQL based on the following query

SELECT id, text_value FROM metadatavalue WHERE char_length(text_value)!=octet_length(text_value)

Talking to Nessus 6 API

Nessus 6 has an exciting new API…. which means that systems that rely on the old XML API and things like Perl modules to encapsulate it are going to take a bit of work to port to the brave new world.  My chum Niraj is looking at doing that here, but wanted an example of the new API in use that he could build on.  Luckily I’ve done more Perl API hacking with JSON than a person should admit to, so it didn’t take long to knock one up for him.  I thought I’d share it here for other people’s edification (and also to stop Gary, my boss, saying that I don’t blog enough).

Hopefully the comments will help explain what is going on, but the over view is that the code is in two parts really. The first part creates a session for a given username and password. This gets given a token by the Nessus API server to say, “Yes, you’ve logged in”. This token is then used in a Custom HTTP Header in the second part of the example to request a list of scans. These come back in JSON format so we turn them into a Perl data structure using the JSON.pm Perl module and then do whatever funky thing we intended to do with the data. I hope that’s clear! 🙂

#!/usr/bin/perl

use strict;
use LWP;
use LWP::UserAgent;
use JSON;
use Data::Dumper;

# This line is a hack to deal with the duff SSL certificates on the test server
BEGIN { $ENV{PERL_LWP_SSL_VERIFY_HOSTNAME} = 0 }

# Where we talk to
my $apibaseurl = 'https://nessus.example.com:8034/';

# Get the username and password to use
my $username = shift || 'mrtester';
my $password = shift || 'testytesting123';

# Create a user agent (web browser) to talk to the Nessus server
my $ua = LWP::UserAgent->new;
$ua->agent("LboroScanHack/0.1");

# Create the POST request that encodes the username and password
my $req = HTTP::Request->new(POST => $apibaseurl . 'session');
$req->content_type('application/x-www-form-urlencoded');
$req->content("username=$username&password=$password");

# Make the request of the Nessus server
my $res = $ua->request($req);

# See if it worked and if so, get the session token
my $NessusToken = '';
if ($res->is_success) {
my $result = from_json($res->content);
$NessusToken = $result->{'token'};
} else {
print $res->status_line, "\n";
print $res->content;
print "\n";
exit;
}
print "Got a token of $NessusToken\n";

# OK, at this point we have a valid session token. We can now use this
# to make more requests of the Nessus server. Lets get a list of scans as
# an example. For these we're going to need to create a custom HTTP Header
# in the request called X-Cookie that includes the token we've just got.

my $h = new HTTP::Headers;
$h->header('X-Cookie' => "token=$NessusToken;");

# Now create a new HTTP request object for the method/URL we want that
# includes this custom header
$req = HTTP::Request->new('GET' , $apibaseurl . 'scans', $h);
$req->content_type('application/json; charset=UTF-8');

# Make the request to the server including the token.
$res = $ua->request($req);

# Didn't work? Explain why and exit.
if (!$res->is_success) {
warn $res->status_line, "\n";
warn $res->content . "\n";
exit;
}

# Still going so the request worked - convert the JSON content into a Perl
# data structure.
my $scandata = from_json($res->content);

# Print it out
print Dumper($scandata);

# Do some funky stuff with the data
foreach my $thisfolder (@{$scandata->{'folders'}}) {
print "$thisfolder->{'name'} is a $thisfolder->{'type'} with ID $thisfolder->{'id'}\n";
}

Timetables

Here at Middleware Towers, we were asked to look into providing students with access to their timetable, in a variety of methods. We have already blogged about inputting the data into google calendars, but for a variety of other applications we wanted a method that was lightweight and portable. We wanted to avoid being too heavily tied into the University’s systems, so we could give the methodology away without having to worry about bespoke parts.

JSON

Readers of our blog (you must be out there somewhere) will know we like JSON, we like it a lot, here’s why:

(JavaScript Object Notation) is a lightweight format based on the ECMA-262 standard. It is easy for humans to read and write. It is easy for machines to parse and generate and uses conventions that programmers using the “C” family of languages will be comfortable with. These properties combined with its universal data structures. make it an ideal data-interchange language.

Taking the module calendars we are already creating for our students google calendars, it was relatively trivial to also create JSON files of the same data (one per module, created by a script, controlled via Cron). These files would be in the following format:

[
   {
      "ROOMID_STR" : Harry Palmer 101,
      "MODULEID_STR" : "ABC001",
      "MODULENAME_STR" : "Advanced Converter Cars",
      "SLOTID" : "721",
      "STARTTIME" : "11:00",
      "ENDTIME" : "13:00",
      "LECTURER_STR" : "Professor Pat Pending",
      "DATECHANGED" : "201402140944",
      "MAPDATE" : "20-MAR-15"
   }
]

A further file per module would also be created, which would list those students registered on it. It takes the following format:

   {
      "j.bloggs@student." : [
      "ABC001",
      "ABC001 (B)"
   ]
}

The (B) indicates a cohort of the module, this is common practice if the module membership is large, it splits the students into smaller groups for such things as tutorials. We wanted our timetables to be fully personalised, so we also created JSON files for any cohorts a module may have.

Now we had the data in a format we could access and manipulate, we needed to find something which could present it to our students in a manner they were familiar with.

Fullcalendar

Fullcalendar is a jQuery plugin from MIT (who seem to produce an almost unending supply of these sorts of thing), It provides a well documented, AJAX based google calendar like environment. Its API is rich and it is easy to personalise the output. Some simple jQuery settings will allow you to control the default view and the type and position of controls and information:

header: {
        left: 'prev,next today',
	center: 'title',
	right: 'month,agendaWeek,agendaDay'
	},
editable: false,
firstDay: '1',
defaultView: 'agendaWeek',

This places the “<”, “>” and “today” buttons on the left, the month week and day button on the right and the title in the middle. It also makes it read only, sets the first day to monday and by default shows a week view (see fig 1)

fullcalendar
fig 1: Fullcalendar configured as above.

Provide the plugin with correctly formatted JSON, as below and you will get google calendar like output as seen in fig 2.

[
   {
      "title":"ABC001 Advanced Converter Cars with Prof Pat Pending in Harry Palmer 101",
      "end":"2015-03-20 13:00:00",
      "start":"2015-03-20 11:00:00”
   }
]

event

fig 2: Event output from JSON in Fullcalendar

Keen eyed readers will notice that the JSON required by Fullcalendar, doesn’t match the JSON we have in our module files. This would require some, on the fly, programatic manipulation via Perl (the one true language), to stitch together the lecturer, room, id and module name to form the “title” element. The datetime elements are formatted using perl’s localtime, split and join functions.

Putting it all together gives us a students personalised timetable in a portable format, that could be used for any of our applications (VLE, portal, student support systems etc) without any bespoke tie in to other systems.

A special thanks go to our IT support assistants (both past and present), for being willing guinea pigs and especially to Tom for remaining positive and optimistic, whilst we were destroying his google calendar setup on an almost daily basis.

Dashboards

lorls-dashboardIn 2012 we produced a dashboard for our reading list system that allowed academics to see how (and if) their reading list were being used. This proved to be a great success both with the academics and also in terms of the approach taken to develop it. So a year later when there was a need to produce some statistics from the newly installed access control system in the Library we choose to repeat ourselves. acs-dashboard

We were supplied with the log files from the access control system and enriched this with additional information from the Library Management System. A database was created and associated script developed to regularly import the information into the database. A small series of CGI scripts were also produced to extract information from the database and return the results in JSON/JSONP format, which was in turn is processed the front end HTML5 web page using appropriate plug-ins. The dashboard has been used by the Library to promote the success of its recent extension and refurbishment and is being used to monitor occupancy levels (particularly during peak periods such as exams).

And then we did it again!

labs-dashboardBy taking a snapshot of the lab availability system every fifteen minutes and putting the resultant information into a simple database, we used the same tools to develop another dashboard recently to show the use of IT Services managed Lab PCs across the campus. IT staff can now see the occupancy of these labs over time, when they were booked and even see a map of PC hot spots.

So basically our philosophy seems to be: You’re having a dashboard! You’re having a dashboard! The whole INSTITUTION’s having a dashboard! They’re having a dashboard!

Digital Signage

Seminar Room 1As part of the recent refurbishment of the University Library, six digital signs were developed and installed to display room/resource bookings and the availability of computers in computer labs.  The underlying technologies behind these signs are Raspberry Pi’s running Screenly OSE, an open source distribution.  The content displayed is a HTML5 webpage that regularly updates its content with data retrieved from the Library’s room booking API’s and University labs usage API’s.

Cost comparison of Raspberry Pi and other units for driving digital signs

Cost comparison of Raspberry Pi and other units for driving digital signs

Raspberry Pi’s provide a significant cost saving when compared to traditional digital signage systems.  The initial cost of the hardware (approximately £50) is an obvious benefit, with other digital signage computers costing between £200 and £500.  There is a supplementary ongoing saving due to the power requirements of a Raspberry Pi being far lower than traditional units.  In fact a potential saving of over £70 per unit per year is shown when compared to the iBase SI-08 digital signage system.  Taking this a step further we can compare the units based upon their ongoing impact on the environment, where the Raspberry Pi’s low energy requirements again shows it produces far less KgCO2e (kg carbon dioxide equivalent) than the other units it was compared against.

Approx Cost Watts Kwh/year Ongoing Cost per unit per year (15p/Kwh) KgCO2e per year
Raspberry Pi £50 5 43.8 £6.57 19.51
Acer Aspire Revo £300 29 254.04 £38.11 113.17
SI-08 (Digital Signage System) £400 60 525.6 £78.84 234.14

Scaling the solution

While the initial digital signs were a big success there were still a number of issues that needed to be tackled before the technology could be adopted on a larger scale.  The key areas that needed to be tackled were:

  • Ease of installation and configuration of new units – Ideally the units should simply need plugging in to their screens, network and power and then be available.
  • Devolved administration – It would be essential that individuals can administer their own units and not those owned by others.
  • Ease of administration of each unit – Due to a lack of security options on the open source version of Screenly, the original units were secured by requiring an administrator to use ssh to connect to the unit before they could access the administration web interface.

To meet these requirements a new SD card image was created (based on the open source Screenly image).  This image was enhanced to communicate with a new back-end system, that was developed, to manage the administration of the units.  To avoid having to manually configure the network settings on each unit they use DHCP to pick up local network settings and a valid IP Address.  Every time a unit is issued with a new IP Address, or renews one it has already been issued with, it checks in with the back-end system.

pcAvailability

Each time it checks it in it passes the back-end system its current IP address and its MAC address.  If the system hasn’t seen the MAC address before it creates a new unit record and populates it with the units details, if a record already exists for the unit then it’s updated with the new information.

When system administrators access the back-end system they are presented with list of any units that haven’t been assigned to a group.  They can then assign the unit a name and a group.  They can also add users to groups and create new groups if required.

Users can be added as either a standard user or a group administrator.  Currently the only difference between the two is that a group administrator can add new users to their group and remove existing users from their groups.  Each user in a group can access the administration interface of any unit assigned to that group.

In the unit’s administration interface users can add and order a number of assets to be displayed.  Each asset has a name, a type (either image, webpage or video), times and dates that it is valid between and a duration of how long the asset should be displayed for.  The ordering that active assets are displayed in can be adjusted by dragging an asset about the list.

One final thing to consider when scaling the solution is that the savings discussed earlier also scale.  For example the six Raspberry Pi’s running in the Library have, all together, over the last five months used £16 worth of energy or to put it another way they have used £78 less energy than six Acer Aspire Revo’s would have and £180 less than six iBase SI-08 units.

We are currently testing the system with the intention of digital signs being deployed outside of University computer labs ready of the start of the new academic year.

Apps for Education

Google Apps for Education allows HE and FE institutions to make use of Google Apps services for their staff and students. This includes services such as email, calendaring and file store.

At Loughborough University we’ve been investigating how to integrate some of the Google Apps for Education services into our local IT ecosystem to improve the student experience. What follows is a brief overview of two of these developments – one for Google Drive and another extending the use of Google Calendar.

Google Drive

We were asked to look at using Google Drive to provide additional file store for students. This would not only cut down on our file storage costs for students, but they would also be able to more easily access their files when off campus or using mobile devices. Additionally they could potentially share their files with 3rd parties (eg work placement employers, friends at other institutions, etc) which would be difficult to do with locally held file stores.

Google provide a web browser based user interface to this service and also a Windows file system plugin. We had hoped that the Windows plugin could be used on our lab PCs around campus to give students a seamless view of the Google Drive file store, but unfortunately it appeared to only use the Google credentials for the user that originally installed it. This was fine on staff machines with only one user, but our lab machines may have many people using them and are locked down to prevent students installing new software.

We therefore looked to the Google Drive Application Programming Interface (API) to see if there was a way we could work round this.  As well as providing multiple users on the same machine with access to the file store, we really wanted to avoid having to ask the user for their password again to access the Google Drive. Instead we intended to make use of the Active Directory log ins that they had already made on the lab PCs.

We decided the easiest way to support this was to use a Linux machine running Samba as a “bridge” between the Windows file sharing world and the Google Drive APIs.  Samba is a free, open source implementation of the Common Internet File System (CIFS), which is the underlying protocol that supports Windows file sharing.  As well as being open source, Samba also has the concept of Virtual File System (VFS) modules, which are extensions that allow developers to intercept CIFS operations to provide additional services.

After testing basic functionality via the pre built PHP client libraries, we started prototyping in Perl in order to work out how to generate the OAuth2 delegated authority JSON Web Token (JWT). OAuth2 allows a Google Apps service account to authenticate to Google’s servers and then act on behalf of one of our Google Apps users.  These prototype Perl scripts were designed to be “thrown away” – they merely allowed us to experiment rapidly in a comfortable development environment.

Once we had the Perl prototype authenticating successfully and issuing the RESTful Google Drive API calls, we then turned our attention to implementing a Samba VFS module in C. Whilst using the Samba version 4 distribution we were actually working with the Samba 3 part of the code, as much of the new Samba 4 code is concerned with Active Directory (AD) domain controller provision, and all we needed our bridge server to be was a fileserver bound into the campus AD.

This new VFS module would first take the username of the user making the CIFS connection and then look up their email address in the campus AD using LDAP.  Once the email address is returned it can then be used to create a JWT for passing to Google’s OAuth2 service to authenticate the delegated service account access to the user’s Google Drive account. A successful login returns a limited lifespan bearer access token which is then used with subsequent RESTful Google API calls to authenticate each transaction.

The rest of the Samba VFS module coding was concerned with mapping the CIFS operations to Google Drive operations.  This is quite difficult – CIFS and Google Drive not only have some underlying differences in the way that the file system structure is designed, that requires work arounds in the VFS module, but we also had to learn about the CIFS protocol itself.  CIFS has been developed over many years with additions made as new operating systems and services have been deployed, often with little or no documentation.

Eventually we managed to provide enough mappings for the following simple operations to work:

  1. file or directory creation,
  2. file or directory deletion,
  3. file contents editing,
  4. directory listings
  5. stat() type system calls to return file information (some of which we had to fake!),
  6. file contents caching (to improve performance),
  7. simple whole file locking on the windows side (there is no real concept of locking on the Google Drive side as it is naturally a shared space).

The result of our development is that we can now mount one (or even more) Google Drive file stores on a windows PC simply by doing a CIFS file sharing mount onto our “bridge” Linux server.  Performance is not stellar but is acceptable for many users – caching the files returned from Google on the file store of the bridge server helps a lot, especially as many people read lots of files but only edit a few in any one session.

Screen Shot of Google Drive

Google Drive shown being accessed via both Google’s own web interface and our Samba CIFS bridge


At the moment it is being tested by a number of staff on campus and will be rolled out to shared lab PCs in the Library shortly. One additional advantage of the Samba bridge is that it allows non-Windows machines to also mount Google Drive as a file store.  For example Linux machines can now mount Google Drive storage using this system, which is a platform that Google themselves do not yet support directly.

Calendars

The student Google Apps users get access to Google’s excellent Calendar service. However there are other, pre-existing University calendars with information of interest to students held elsewhere. One example of this is the lecture, lab and tutorial timetabling system. We were asked if we could attempt to bring the timetable data into the Google Calendar system so that students would have their timetables available alongside their personal calendar entries.

There were a number of issues to solve here. We could have created an extra calendar for each student and injected their personal timetable into it, but this would have required many thousands of calendars to be created.  As lectures details often change during the term, we would also have many more events to be maintained. It would not simply be the case of creating the calendar events at the start of the year, term or semester as the calendars will have to be updated daily.

Instead we decided to create a new calendar for every module being taught. This was still around 1500 calendars for one semester but we then further sub-divided them into the “part” of the course (first years are Part A, second years are Part B) with six new users being created to handle the calendars for one part each.

Screen Shot 2014-02-03 at 15.28.48

A view of the first year Mathematics undergraduate module timetables for one week in a Google Calendar.

Google Calendar API then allows us to share an individual module calendar from the “part user” to the student users that are taking that module.

Our system needs at least three different Perl scripts to run:

  1. Create the initially empty module calendars in each of the “part user” accounts (this is the most heavily time dependent part, due to API limitations on the speed and number of calendars you can create at any one time),
  2. Extract data from our existing timetable system’s Oracle database and inject these as events in the appropriate module calendar. This script also needs to handle events that were once in the timetabling system but which have been deleted or changed,
  3. Attach the correct module calendars to each student user. This is done by interrogating both the module group membership from our Active Directory and current state of module calendar sharing, and then issuing the required remove/add ACL rules using the Google Calendar API.

Alongside the ability to share a full calendar of module lectures with our students, we are also able to inject events into their primary calendar directly, using the same core Perl modules to manage the OAuth2 delegation. We have begun to use this by creating “all day” events, listing a students library books due for return.

Screen Shot 2014-02-03 at 15.30.24

A Google Calendar showing a library book return reminder entry.

Thanks to APIs we have created to our library systems, we are able to deduce which students are required to return their books in seven days and can create events, with controlled notifications, in the students calendar prior to the books return date.

We are currently testing these systems, with a subset of the students, to gain feedback and aim to go live for all undergraduate and taught course students in Autumn Term 2014.

New frontend for Booking System

One of the summer tasks we have been dealing with has been to bring the frontend of our Web User Booking System (WUBS) up to date.  The original user interface dates back to when it was first developed (2005) and, while still more than adequate for the task, was starting to show it’s age.

Sample booking screen

After a short discussion in the team it was decided to follow a similar method to that which had been used for LORLS, specifically separating the front and back ends via a set of APIs.  The majority of the development effort was spent on the frontend as the core work on the APIs had already taken place to enable our mobile webApp to review, make and cancel bookings.

The key technologies behind the new frontend are HTML5 and JQuery.  Additional JQuery plugins used are DropKick, to provide the nice looking drop down lists, and Datepicker, for selecting dates from a calendar.